How to tighten cylinder nut

Noobi06

Member
cyl.jpg
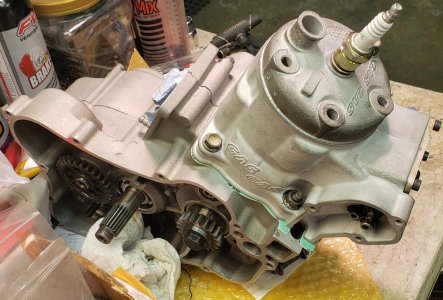
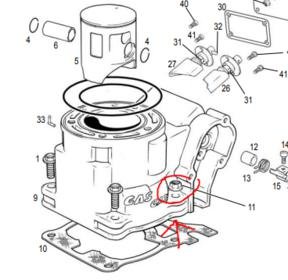
How am I supposed to tighten the nut shown on the image? I can't fit a wrench there to tighten it, nor a socket or a pair of pliers. Right now the nut is at the bottom but is putting zero pressure on the cylinder. On the other side I cant torque it but it is hard tightend. The others 2 nuts that are on the front are both torqued.
Does it matter that it has zero torque? How should I tighten it
 
Torque is hard on those without special tools. I had to grind down the outside of the 12mm wrench to clear the cylinder head. On one of the cylinder I had to use my Dremel tool to make some room around the nut for the wrench. I use the same wrench on all nuts so I am consistent with the feel/torque.

To get one off that does not have clearance for a wrench, you can use a flat nose punch and a hammer to hit the outside flat of the nut to get it free.
 
Yeah I was thinking of grinding down the side of a 12mm wrench. I asked my dad but he said no. Ill try to buy one more and grind it down and I can see if that works.
 
I was taught that any smaller bolts get always get torqued after the main cylinder studs/bolts. So as not to load up the threads in the alloy and risk them pulling out.
 
Look at several manufacturers of wrenches as some are made with a smaller head. Also check to see if the nut is for a 12mm wrench or socket. Someone may have replaced with one that takes a 13mm or 14mm head.
 
I have a nice thin walled Bahco 12mm ring spanner that works nicely on the 300, the 125 is clearly a different arrangement but they must have designed it so it was possible.

Test your feel with a torqued 12mm head nut or bolt somewhere non critical several times till you get the right do/undo feeling and replicate on the cylinder fasteners little bit at a time so they are all even which is most important.
 
dont torque one side first. It has to be gradual criss cross patter. Grind a ring spanner or buy a thin one that fits.
12mm is rougly 1/2", so you can easily fit a 1/2" torque wrench on the open side of spanner and correctly torque the nut. Spanner-torque wrench should be completely in line.
Also you have do downsize the torque value, since moment arm is bigger with spanner attached.
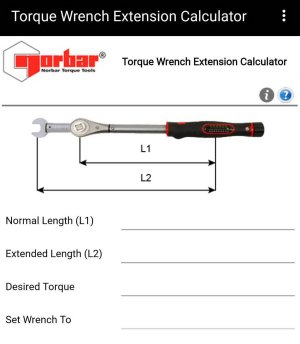
For this I'm using torque wrench extension calculator from playstore.
 
The 2 front nuts I am able to torque without problems. One of the nuts I can use a regular wrench and one I will grind down. How important is it that the 2 rear nuts are torqued? I can try get a feel for 34nm with the front ones but I if I just snug them up real good, Isnt that enough?
 
13mm is slightly larger than a 1/2 inch. 12mm is quite a bit smaller than a 1/2 wrench. He needs to use a 12mm wrench.
 
You need to do two things. 1. Get all four cylinder fasteners to a similar torque and 2. that torque should be close to the rated spec for the application.

If you get a feel for the force needed to achieve the proper torque rating, you can get close enough without a torque wrench if you do some practice first.

You can practice by putting different nut and bolt in a vice to get the feel for the amount of force needed to attain the torque spec using the torque wrench. Once the bolt is torqued to the proper level, mark the nun/bolt with a marker to see the alignment.

Loosen the bolt and then use the 12mm wrench (with the small/thin head) to tighten the bolt so the marks align. Different length wrenches will give a different force feel and torque based upon the distance your hand is placed from the center of the fastener you are tightening. The longer the wrench more leverage you have the the less force you will feel at your hand for a given fastener torque.

Put your hand in the same spot on the wrench each time and match your grip each time. Try to remember the feel of the force needed to re-align the nut and bolt to the mark. You need to minimize differences to increase consistency. Try to align your body so you are using a normal body mechanics and pull toward you (try not to use strange body angles in odd positions).

Do this practice a few times in the vice. You will probably need to remark the nut and bolt each time as the nut and bolt wears. Once you get the hang of it you will be able to get close enough to "torque down" your cylinder.

As indicted earlier you need to use a criss cross pattern and increase the force in a few steps and your final torque needs to be a smooth movement until you reach the desired force/torque and stop. Static friction to move something from rest is higher than the dynamic friction to keep it moving. It takes less force to keep a nut moving than it does to start moving it from a stop. Therefore, if you need to stop moving a wrench before you achieve the final torque value (because you run out of room to move the tool), you may need to loosen the fastener and start again because the static friction to get the fastener moving again may be higher than the final torque value you need to achieve.

A word of caution, I recently rebuilt a GG125 and the previous owner over-torqued the 4 fasteners and warped the cylinder so the base gasket leaked coolant. Too tight is not better.
 
Do you mean I can fit a 1/2" 12mm socket in there? In that case I can actually torque it. I can go buy one but I doubt 1/2" will fit
 
Most of us are talking from a 250 or 300 owner ship. Not many will have had a 125 so please temper our advice with that in mind..
 
Buy a 12 spanner, with both open end and ring end and make a special tool out of it.

Grind the outer ring thinner so it can fit on the nut.

Grind the open end of the spanner a bit wider, rougly to 12.7-13mm, so it can fit snugly on the 1/2" square socket attachment on the torque wrench.

Go to playstore and download TORQUE WRENCH EXTENSION CALCULATOR

attach spanner to wrench so they form a straight line

Measure and input two lengths desired by program (metric, imperial doesnt matter)

Input desired torque value for the nut (metric, imperial, doesnt matter)

Program will calculate new value for torque setting of the wrench, since extended wrench needs to apply less torque, but the actual torque on the nut will be correct

Never fully torque one side only, just because you can. Sth can break, bend, misshape..
 

Attachments

  • 322537394_569632274545228_3781393735164056251_n.jpg
    322537394_569632274545228_3781393735164056251_n.jpg
    75.4 KB · Views: 10
The 200, 250 and 300s front two bolts are more difficult to reach than the 125.

The 125 bolts can be reached with a 12mm wrench with a small / thinned head.
 

Attachments

  • GG144 engine.jpg
    GG144 engine.jpg
    128.1 KB · Views: 14
Im gonna try 5valves idea first. If im unable to do that, im gonna do like zman said and get a feel for the torque and then just apply it manually.
Thanks guys
 
I tried 5valves technique and it worked really well! Thank you a lot.
I sanded down the outer ring of a 12mm wrench, and a bit of the inside on the open end. I put the open end on a socket and onto the torque wrench and the other end onto the cylinder nut. It fit perfectly as I sanded it down.
I then used the app as you said. With the extended wrench, I was supposed to use 17nm instead of 25, but as mine only supports 20 I used 20 but left some torque.
Thank you guys!
 
Hope that wasn't dad's good wrench. Grind off the 12mm mark on the open side and punch in GG!
 
No Special Tool Needed

SL7f61Ym.jpg
 
Back
Top