07 45mm Shivers binding

mike989

New member
What's the trick to bolting the front wheel back on and not binding the forks?
I changed the oil and seals on my 07, and after bolting the wheel back up the fork action is not as smooth. All the adjusters are set at full soft.
Binding might be too strong a word to use, but can't think of another that fits.

Separately, off the bike both forks worked smooth after the oil change.

Is there a procedure as to which axle pinch clamp is tightened first? Ive repeated the wheel install procedure a couple of times. I can reduce the binding somewhat. Can the triple clamp effect the binding of the forks? I don't have a torque wrench yet, so I used a 1/4 drive ratchet to keep the torque to a minimum.
 
Get a torque wrench ASAP, its important that you don't overtighten the lower T-clamp. Torque the center bolt and then just snug the upper and lower bolt. With the bike on the stand, axel in place, and pinch bolts loose, first snug the brake side axel nut to seat the axel, torque the pinch bolts, and then torque the axel nut. Now, spin the wheel and grab the front brake. Hit the right side fork foot with your hand a few times to move it slightly on the axel and allow it to find its natural position, and torque the right side pinch bolts. I have had no problems and excellent fork action using this method.
 
What GMP said.

Also re. the front fork adjustments. The axle should be greased. It is especially important to grease the wide part of the axle that fits inside the down tube on the non rotor side. Also make sure that this wide part of the axle has no burrs on it. If your not sure, you can take the threaded part of the axle in your hand and slide the thick part into the non rotor side down tube. It should fit and move in and out without binding.This down tube is the adjusting tube. Once the axle nut is tightened down and the rotor side tube is pinched the fork is adjusted by making sure that the non rotor tube isn't binding. I usually do this adjustment by sitting on the bike locking the front brake and pushing forward and bottoming out the forks a few times so they can find their place of least resistance. Then I tighten down the non rotor side pinch bolts.

If it still seems to be binding, you might want to ride it around slowly with the non rotor side down tube pinch bolts loose and bottoming out the front wheel by hitting the front brake a few times. Then tighten down the pinch bolts on the non rotor side.

Tony
 
With the bike on the stand, axel in place, and pinch bolts loose, first snug the brake side axel nut to seat the axel torque the pinch bolts, and then torque the axel nut....

My procedure deviates slightly...
After sliding the axle into position, I snug the non-brake side pinch bolts (temporarily). This will hold the axle while you torque the axle nut. With the brake side pinch bolts still loose, I torque the axle nut to the proper torque. This brake side fork leg can move as needed to ensure proper seating of the axle, wheel spacer, and fork leg during axle nut torquing. Then, I torque the brake side pinch bolts and this side is completely done.

Next, I loosen the non-brake side pinch bolts (those that were temporarily tightened previously). With these pinch bolts loose, I allow the non-brake side fork leg to center itself (as explained by Glenn and Tony). When I'm happy with my self-centering abilities, then I torque the non-brake side pinch bolts and that side is completely done. Everything in the world is at peace again and you can ride!

EDIT: Short version... Tighten right side pinch bolts, Torque axle nut, Torque left side pinch bolts, Loosen right side pinch bolts, Wiggle right side fork leg, Torque right side pinch bolts. Ride!
 
Tony made a good point about making sure the axel is clean and greased so it is able to float in the fork foot clamp and find its center.

I do not torque the lower T-clamp more than 8 -10Nm. If the bolts are clean and anti-seized like they should be, this is adequate. Never had a problem on 3 GGs as the clamp area is quite large. You would be shocked to see how a forks internal anodizing gets wasted from running that clamp too tight. Every new bike I've set up had been over torqued.
 
Not to add anything to the procedures mentioned above but many riders don't know the correct procedures because they don't know why it's done that way.

The reason that the Rotor side has to be locked in place before any final adjustment is because the rotor side has to have the rotor correctly aligned with the caliper not the fork. Once the rotor side is done, it might be worth while to check and see if the rotor is exactly where it's supposed to be with regards to the caliper.

Then proced with the final adjustments.

Having answered that, I also have a question re. the final adjustment procedure. Matts and GMPs procedure follow most mfgs procedures for the Rotor side adjustment. What doesn't seem right to me with this is that the axle nut is partially tightened then the Rotor side pinch bolts are tightened down. Then the axle bolt is finally torqued. To me it seems that the final torquing of the axle bolt reintroduces stress to the already torqued pinch bolts. So I never do it that way. I always torque the axle down than torque the Rotor side pinch bolts. To me this just seems to make more sense even though I've never seen a manual that recommend my procedure. I just don't know the logic of doing it the other way and no one has ever been able to explain it to me.

Tony
 
I always thought it possible that the side load on the axel clamp from first torquing the axel nut could cause a bind in the clamp and incorrect torque readings or premature trip of the torque wrench. That was my rational behind just using the axel nut to take the play out of the system and seat everything, then finishing the final torque later. I suppose if we wanted to get anal about this we could try it both ways and measure the gap in the front of the axel clamp with a feeler guage and see if this is true. Maybe its not and works fine either way.
 
Your way is the usual manual described way of doing it. I always just thought it was so that you had a method of holding the axle in place when it was torqued down. I always use a hex insert to hold the axle from rotating. But, that was the only rationale I could think of.

Tony
 
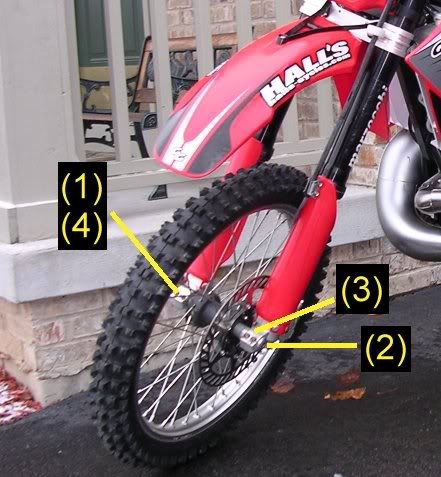
A pic is worth a thousand words. :)

Tighten pinch bolts (1) --> temporarily holds axle.
[Make sure pinch bolts (3) are loose!]
Torque axle nut (2).
Torque pinch bolts (3).
Loosen pinch bolts (1).
Wiggle fork leg, spin wheel, center it, etc.
Torque pinch bolts (4).
Done. :D

front_wheel_install.jpg
 
Back
Top