Sachs fork valving '10 300

Bailey28

New member
OK guys, I am starting to ride in a new area which has lots of limerocks, roots, ruts, and loose baseball to bowling ball sized rocks.

I noticed that the stock '10 Sachs worked great on moto tracks, and faster soft sandy trails and such. In the heavy rocks and roots the front is killing my speed by deflecting and skipping around. Small washboard roots make the front end disconnect from the trail, and sharp hits jar and wear me out.

I believe at this time I would need to go into the fork to change the high speed compression valving and aside from doing this on a KDX I have no other revalve experience.

How hard would this be to accomplish at home? What special tools would I need to do this? I am a tinkerer at heart and would most likely take the forks apart several times to get what I wanted after experimenting.

I already saw that I need a 50mm 10 point wrench for the caps.

Would it be easier just to send them out?
 
Last edited:
Sounds familiar. I will be keeping an eye o. This thread

Doubt you need the 50 spanner. The fork caps should be only slightly tighter than finger tight (if you remember to loosen the t clamp pinch bolts first!)
 
Thats probably not the best fork to learn on. The cartridge apparently does not come apart as easy as Zokes, plus the shims are an odd 7mm ID size. Also, a proper revalve is more than just compression shim swapping. Have a pro like LTR go through it.
 
OK guys, I am starting to ride in a new area which has lots of limerocks, roots, ruts, and loose baseball to bowling ball sized rocks.

I noticed that the stock '10 Sachs worked great on moto tracks, and faster soft sandy trails and such. In the heavy rocks and roots the front is killing my speed by deflecting and skipping around. Small washboard roots make the front end disconnect from the trail, and sharp hits jar and wear me out.

I believe at this time I would need to go into the fork to change the high speed compression valving and aside from doing this on a KDX I have no other revalve experience.

How hard would this be to accomplish at home? What special tools would I need to do this? I am a tinkerer at heart and would most likely take the forks apart several times to get what I wanted after experimenting.

I already saw that I need a 50mm 10 point wrench for the caps.

Would it be easier just to send them out?

I posted a reply but now its gone ... hurumph! Basically what I said is this...

You don't need a 50mm 10 pointer, although they are cool (I had a couple made up). There is a regular hex head in the center of the cap (19 or 21mm IIRC).

You can do the job somewhat easily without ever removing the caps though. Turn the fork leg upside down (right side up for old guys), and carefully remove the compression tap with an impact gun. Why carefully? Because the material and geometry make it seem like the taps are made of room temperature butter.

Cover the open hole and set the legs aside. With good handling you won't even have to adjust oil level (although you should likely change the oil if you haven't yet).

Clamp the compression tap in a vise and carefully remove the shims and piston, making good notes as to size and orientation of all the bits. Adjust the valving as you desire and then reassemble, using a dab of threadlocker and 25 INCH-POUNDS of torque. Reinstall the taps in the fork legs, and its back to the garage to finish up.

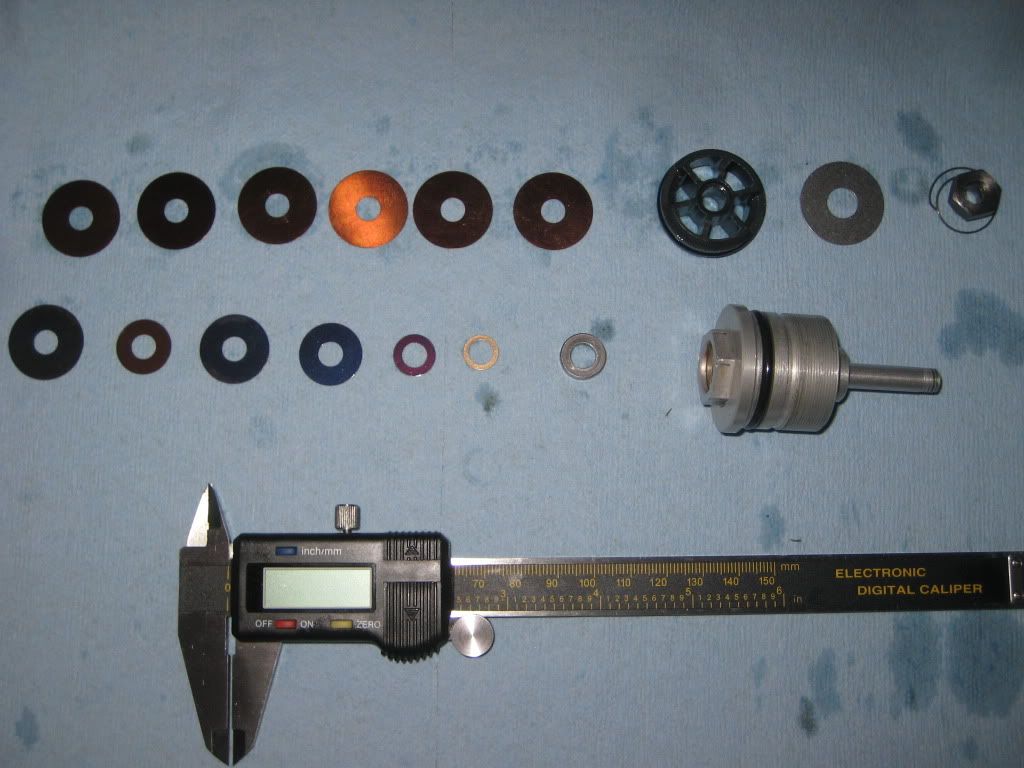
I've attached a couple pics of what you might expect to find inside. Like Glenn said though, if you want to get much beyond working with the compression settings you'll end up having to make tools (like I did) to work on these.

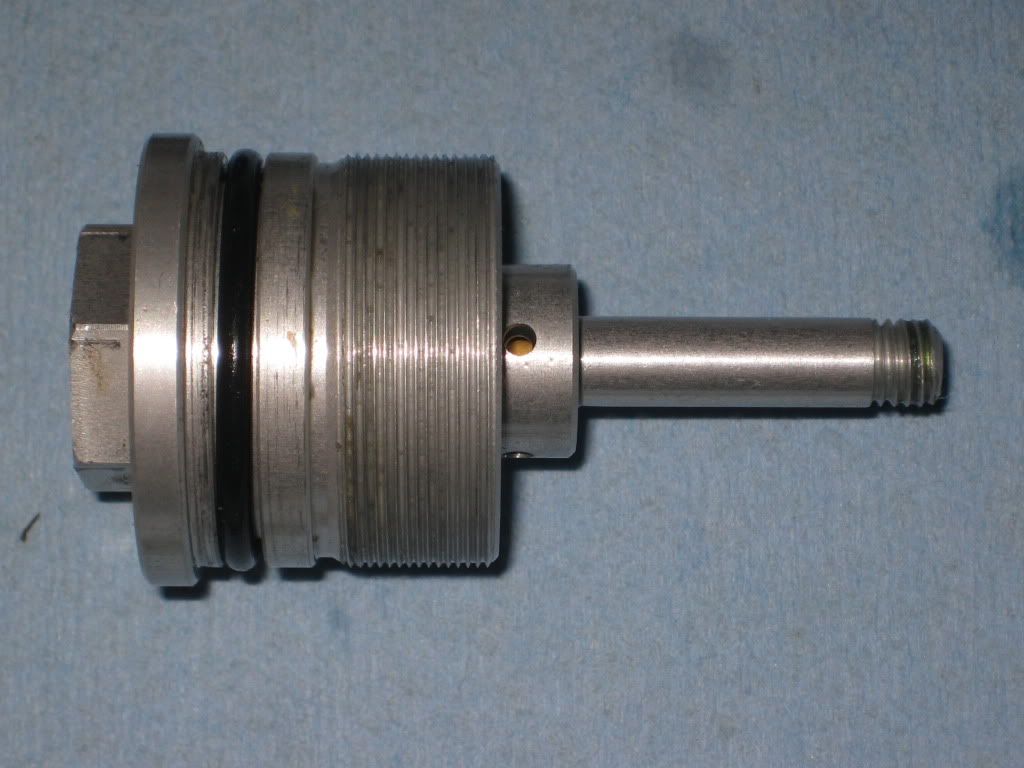
The compression tap stripped of the shims and piston looks like this
Sachsforkinternals007.jpg


Laid out on a bench that translates to
Sachsforkinternals005.jpg


Hope this helps.
 
Last edited:
Here is the base valve shimming laid out http://gasgasrider.org/forum/showthread.php?t=7546

I had great success with no revalving on my '10. Solution was to stiffen up rear shock. My setup now is:
4.6 springs, 100mm 7w oil, comp clickers 10 out, rebound 10 out.
rear is ?hlins shock with a 54 spring, hs 1.5 out, ls 10 out, rebound 13 and static sag set to 25 mm. I weigh in at 88kg now, and this setup is super sweet on choppy ground at high speed. For slower, more technichal terrain i change ls comp to 13, same with fork comp, 13 out. I have noticed that the Sachs forks love to build up air pressure, after a 2h race it sounds like i am emtying my wheels when i open the fork bleeders. This excessive buildup is unbalancing the suspension and makes it feel harsh. I really need to install pushbutton fork bleeders.
 
Sweet, thanks guys... Steve, your pics didn't show up, says they were deleted.


I am a good mechanic and can fix a wide variety of things on the bike, cars, house, etc. I just need an understanding of "how it works" before I get into it and start so please forgive any seemingly overly basic questions on this.

Is removing the base valve and changing the shim stack down there going to affect any of the high speed compression? Or only the low speed? I am quite happy with where the bike rides in the stroke now and the balance between the overall front to rear feeling. I can corner well, and the bike is stable. I just wanted the HS damping charachteristics a little softer on sharp hits without changing much else on the fork.

Years ago, a suspension tuner who revalved a set of YZ forks told me while I watched him do it "You want the suspension resistant to move, but once it starts moving, let it move". I guess he was talking about having the springs and LS compression stiff enough to hold the bike up and control movement over smooth and rolling ground, but on sharp hits, let the fork move to absorb the shock load.

Again, I appreciate the input and if it is not too difficult to do, I would not mind playing with it a little to get the feel I am after.
 
So the diagram here:

http://www.husaberg.org/modules/gallery/albums/Suspension/BaseValve2.jpg

refers to a two stage stack, as what Bergerhag found in his Sachs fork?

From Bergerhag: Ok, now I have investigated the factory settings of the fork. I was surprised to find 140mm oil level, and a light 2-stage compression stack.

Stack:
24x.15 LS
12x.15 LS crossover to HS

20x.15 HS
16x.15 |
14x.15 |
12x.15 HS

10x.30 Collar?
10x.30

comp piston has two large channels for the compression flow, with two 1 mm-bleed holes.
----------------------------------------------------------------------------------------------------------------------

Do I have it right that the HS stack starts "under" the first 24 and 12mm shims?

If this is correct, could I play with the HS stack, maybe remove either the 14 or 12mm shim then reassemble and try it?

Again, for those of you who have been in there a hundred times, any suggestions would be great. I tinker all the time and aside from a near perfect bike, this is the only area that I thought needed some smoothing out.

You could remove either the 12 or 14. If you are particularly sensitive to these things and have a consistent test surface and protocol you could experiment with removing the 12 but leaving the 14, then removing the 14 and leaving the 12.
 
That is great, I'm happy to see that I can get in there with minimal intrusion. Modifying the compression stack is the first thing that I wanted to try, and it seems rather straight forward. Of the two, which would make the biggest difference for removing only one shim, the 12 or the 14?

I may keep the same oil in it for right now, just to keep the variables to a minimum after taking out one of the shims.

A question on oil, what type are you guys using? I have used Belray in the past, but I noticed much more stiction with the Belray with my WP forks on an older KTM.

If you are using 5W oil, what have you been putting in?
 
From what I understand these forks are and look very similar to the older wp forks.
two much needed mods was to use a lighter mv spring and set the gap to .9 or 1.0mm
The lighter spring helped alot with the harshness because the stiffer oem spring shut the gap way too fast along with a stronger holding force. The lighter spring kind of acts like a bleed for the little abrupt hits. It let's the fluid pass!

Rob
 
Fork valving update!

Hey guys, got into the fork this afternoon. The base valve nut is a 19mm and came out rather easily with the legs compressed a little.

I didn't drain or change the oil as I wanted to feel the valving changes and not have too many variables.

I took the stack apart and moved a 12mm shim to the existing crossover 12mm shim. My new stack is this:

24, 12, 12, 20, 16, 14, 10, 10.

I saw two small 1mm bleed holes in the piston, and a hard silver shim on top that floated up and down with the spring. I kept the LS clicker at 10 out, and the rebound at 11 out.

The bike rode great, and testing in the yard with some 6-7" diameter logs proved that the front was now a bit softer than the rear. The bike tracked great, turned great, and felt connected.

Still, I tinkered more:

I took it apart and went to:
24, 12, 12, 20, 16, 10, 10. I left out the 14 thinking it would be even softer on sharp hits..........WRONG! :confused: The bike seemed harsh and it wallowed a bit in front. Maybe too far down in the stroke? It was as harsh or harsher than before I started.


So I returned to my 1st set up. I got the idea of moving the 12mm from the second stack to the 1st one from this post where TNT Cycle did some work:
Forks seals could be going? Mine never built up much pressure until they had some hours on them. Iam at 65 hours and they will build up quickly now as the seals allow air to bypass as they move.

I did some revalving with my 2010 sachs and love the results. I took the 12mm shim from the base of the base valving and added it to the crossover. I took the midvalve apart and removed one check plate shim and reassembled. Oil level is set at 100mm. The results are brillant for my 155pound self. I did moto and trail riding to test it out and couldnt believe the difference.

cheers,

Rick

I, at this point, cannot get into the midvalve as I have no tools to further take apart the fork to try the rest of this mod. I weigh 185lbs, not 155 like TNT cycle. BUT, come oil change time I would like to get in there and take out this extra check plate shim he talks about. Am I correct in thinking that he took the 12mm out from the base of the stack and added it back in between the 24 and 20, with the other 12? I can't imagine where else it would go. But then again, I am just learning this new mystery!

Any suggestions on what to do to just this compression stack to get rid of more HS damping would be great!
 
Last edited:
I figured as much.... to get to the good stuff, I need to take it apart.

I don't plan on putting any suspension tuners out of business here, but I would like to get a tool to hold the cartridge. The whole "heat it up" thing scares me regarding the cartridge. :eek:
 
I figured as much.... to get to the good stuff, I need to take it apart.

I don't plan on putting any suspension tuners out of business here, but I would like to get a tool to hold the cartridge. The whole "heat it up" thing scares me regarding the cartridge. :eek:

Good luck with the "get a tool". Think more like "make a tool". And you don't need to heat the cartridge to molten ... just almost :D I've found the Sachs cartridge seal heads like to be heated coming off AND going back together. A good heat gun will take care of it - just remember there is a seal inside there :eek:
 
Too bad the cartridge end with the midvalve and rebound stack doesn't pop out of the end of the cartridge tube if I drain the oil and collapse the fork.

I am at about the limit of confidence here with doing the base valve which was way easier than I thought it would be.

I can make tools in the garage. Hell, for a cartridge holder on my KDX forks, I took the rear axle off, cleaned it really well and used the hex end to hold the cartridge inside while I broke the base valve loose! 22mm IIRC on that one. Those forks were really easy as they had no rebound control, aside from a tube with holes in it. The Sachs seemed much more complicated.

I guess I could go inside for a true oil change as well. And check on the 1mm spacer that Steve mentioned was cracked and coned on his fork.

It's true!! once you get inside, it is hard to stop. Especially after getting (apparently) so close to the mid valve. I dream about getting to the mid valve at night!!
 
Back
Top