ASII Float Level With Pix

andoman

New member
I have read a lot recently about poor fuel economy and the adjust-ability (or lack thereof) of the float height of the the ASII. I only have a couple of hours on my '11 EC 300, but with a 40 pilot, E3CH needle in #2, and a 172 main at 5000 feet, I shouldn't use half a tank in an hour of trail riding.
I read that the "adjustment tang" was plastic and could not be adjusted. I opened mine up to find out for myself and thought I would share some interesting fact that I learned.

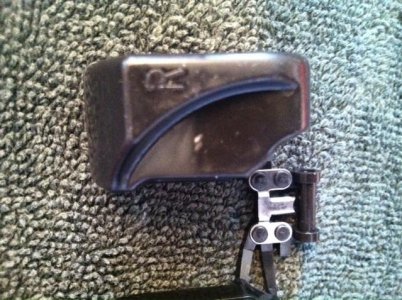
Pix #1: you can see that the adjustment tang on mine is indeed metal and will bend. I was very careful, because the whole float assembly looks pretty flimsy.
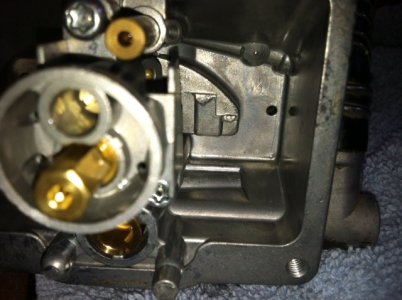
Also, note the witness mark in the center of the right float. It is obvious that the top of the float has been spending some time pinned against the top of the float chamber... In fact, when I turned the carb upside-down, the weight of the float caused it to lay hard against the top of the chamber with no perceptible cushioning by the viton tip of needle in the seat.

Pix #2: The rough casting in the center at the top of the float chamber is what caused the witness mark on the float.

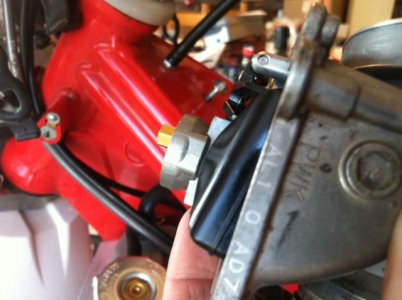
Pix #3: This view confirms that the float height as referenced to the seam in the float is not usable in the ASII. when the float is level to the carb body, the seam is well below the bowl-carb mating surface.

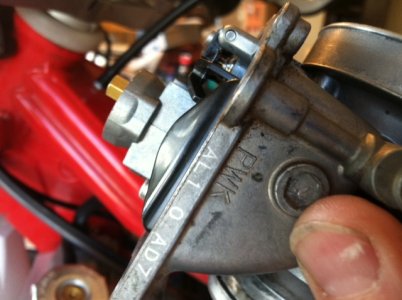
Pix#4: After bending my tang, the carb angle is changed perceptibly in the "lower fuel level" direction. There is also a perceptible contact cushion of the viton tip of the needle.

I have to wait to get my suspenders back from Les at LTR before I can give accurate milage nos. But I will follow up with the info here.
 

Attachments

  • ASIIFloat.jpg
    ASIIFloat.jpg
    72 KB · Views: 1,393
  • ASIIcasting.jpeg
    ASIIcasting.jpeg
    117.8 KB · Views: 1,383
  • ASIIseam.jpeg
    ASIIseam.jpeg
    109.8 KB · Views: 1,526
  • ASIIlevel.jpeg
    ASIIlevel.jpeg
    114 KB · Views: 1,525
does pic #4 have a higher float level then pic #3?

Pic 3 will be with the float just freeballing so that you can see the seam. The next one Pic 4, will be with the carb laying on an angle so that the float tang rests against the needle. If you flip the carb all the way upside down you'll notice it will fully depress the needle and you won't get a correct level either.

Thats the same as how I've set mine up. Just off level. The measurement is taken from the body to the lowest point of the float. About where the AL1 is printed on the body (between L and 1). Stock i think is around 6mm which puts the floats level across body. I moved to somewhere between 7 and 8mm (to compensate for the weird angle the GG carb sits at - tilted forwards).

Running similar jetting specs to the poster (42 N3CJ#2 172) I get over 100kms out of my 9.5L (1000ft+ 90F. 70%+RH)
 
does pic #4 have a higher float level then pic #3?

Jakobi is correct: The float is just "floating" in pix #3 to show the seam. If the float tab were bent and the resting position of the float actually resulted in the position of #3, then the float height would be higher than #4. Raising the float height, lowers the fuel level.

For me, I had to think through the fuel/float relationship several times before I went bending. With the carb upside-down and then with the float assembly upside-down in my hand away from the carb, I had to triple check that I was bending it the correct direction.

Feeling confident about achieving a "correct" height is further complicated because the perfectly straight seam is not visible along the float to readily fix an angular relationship to the carb body.
All that one has are round corners and vague lines made by light reflected off the float. In hindsight, I would have laid a straight reference line on the float with a carefully cut narrow strip of masking tape.
 
Last edited:
I also connected my fuel line up to the carb with the bowl off and manually operated the floats to see when they would begin letting fuel flow and then cut off.

The idea about laying tape is alright. Ideally you'd cut a little template outof cardboard and work off measurements.
 
I also connected my fuel line up to the carb with the bowl off and manually operated the floats to see when they would begin letting fuel flow and then cut off.

That's a brilliant idea. I'll do that.
I wish I had done that before I made an adjustment to see if, perhaps, the float was unable to rise high enough to even cut off the fuel, given the contact the float was making with the top of the chamber.
 
Update

Initially increasing the float height by 1mm to 7.5mm resulted in 22.3 mi/gal (9.4 km/l).
Not as poor as some here have gotten, but not acceptable.
So I increased the level by another mm to 8.5 and got the following: 27.27 mi/gal (11.59 km/l).
This is on a good mix of terrain: flowing single track, short technical sections, a couple of rocky hill climbs, a few miles of fire road.
68 mi (110 km) per tank is more acceptable. Especially since my one race a year is 50 mi between pits. I should just make it without hitting reserve.

My set-up for reference (11 EC300):
RB head mod
38 pilot
N3CH #2
172 main
5000 ft. / 68 F (1524 m. / 20 C)
 
FWW increasing the float height (lowering fuel level) actually lowers the pressure inside the carb which in turn leans the mix out. If you're not running WOT alot then you'll be fine.

2010 EC300R
42 Pilot
N3CJ#2
172 Main
1640 ft / 85 F (500M / 30C)

I'm two sizes richer on the pilot, and 2 sizes leaner on the needle diameter. Essentially the same same with slight differences around 1/8th only. Once on the needle taper its all the same. I also get same fuel economy.
 
Last edited:
I am concerned about WOT. I'm never there in normal riding, but in my race there is a 5 mile section of black-top road. I plan on using the choke lever on the handlebar to richen out for a couple of seconds every 30 seconds or so while she's pinned.
I thought about jumping up to a 175 main, but the idle through 3/4 throttle response is great. I'm hesitant to mess with a good thing...
And I don't want to give up any of my modest gain in fuel economy.
 
Last edited:
I ran mine on a beach for a short squirt using the 172 main. It ripped.

If you're worried, sacrifice a new plug. Do a 5 second WOT pull in 4th gear walking pace up a slight incline. Tear it out and then go home and cut the threads off to check for the black line around the base. I think you'll be plenty safe. IMO this needle if anything feels a touch lean at constant throttle just before it comes onto the pipe. Great off the bottom and great up top. It could also just be the bike preparing to cut loose.
 
To the OP, I can appreciate your concern and ultimately I doubt any text will make you feel comfortable, but here is my experience on extended top end.

I have nearly 3 decades on an 200cc yamaha IT, it is on it's third bore size, original jug, original rod, original big end. The hours on this engine are uncalculatable 1000's? I have never broke a skirt, gouged a jug, rattled a little end, honestly, the bike has never fouled a plug, I put a new plug in it at the start of each season after my winter freshen up and never look at it again for the season, the jetting is clean. This engine works its butt off running with the big bikes of today and yesterday, it has never left me wanting in any condition but running the sand down in SC where the big bores just out power it on the top end. I cannot find my original manual , so I've lost decades of numbers, specs and such,(sore subject, new shop, wife had it last, she admits it, no idea where she put it a few years back when we were moving stuff) but I know sometime in the 90's pretty sure early 90s I changed to Motul 800. I'm not saying buy Motul, keep reading.

I mix my gas 50/1 since that change from the Yamaha lube I used for the first years of the bike, pretty sure original spec was 24 or 32 to one. When I go riding where I expect some extended high rpm runs, I mix 40/1, that is the extent of my prepping my bike for that. That little engine is air cooled, yours is water, it spins with a hell of an overrev it lives its life likely 30% higher rpm than your bike at any given moment. When I run sand I'm running with a TT500, an XT600, a 426 and a kx250 the bike may run for 3-4 hours without ever shutting off it may be pinned wide open for durations that I still wonder why it doesn't just die.

The bottom line, if your plug has a good color print under your normal riding conditions, and you need a little more info, do some WOT pulls from 3-8k as Jakobi mentioned, but I suspect you'll see good color. If you want some mental assurance, run a tank of 40/1 during that race and have a great time!!!!
 
Thanks for the input. I will do a plug check on a new plug just as suggested.

The story of your IT200 was great to read. I rode one back in the 80's and to this day that is the bike I loved most. Finished the Barstow to Veges in '88 on one. Not the dual sport ride, but the real deal.
Man, I loved that bike.
 
I'd be super interested in seeing a pic if you chop it like that too Ando!

FWW Bailey28 used to run a 42 NOZH 160 in similar elevation and temps to me. I called him mad as its the equivalent of us running a 162. He swore the bike absolutely ripped, and put countless hours on it until he had a nasty off and then sold the bike. The new owner is on here.. Just can't remember his username. I'd be guessing he'd still be running the same jets. It was 2010 EC300 with the 38mm ASII.
 
Been having some fuel leaking issues on my 2011 and as expected, poor mileage. Got a chance to pull it apart today, and was glad I did. The float level was quite a bit off from what I would consider "normal." I adjusted it so the float is roughly parallel with the edge of the bowl, not as easy to see as the older carbs. Unfortunately I can only estimate mileage as I dont have a odometer, but I expect improved mileage. :D
 
I did another hard 25 mi. yesterday. I tried to keep her on the pipe more and ride a gear taller whenever I could. Better mileage still: 25mi. on 3.265l. So, 117Km/tank or 72.2 mi.
I can live with that!
So, it seems that dialed in jetting and proper float height will solve the gas guzzling nature of the late model Gasser.

hard to beat those numbers. I'm temped to pull mine back out and adjust it closer to your height. In the summer time we ride a lot of high mountain trails and can make over 100 mile loops. In situations like that we carry extra gas in our packs, but having an efficient bike it key. I wonder how much your head mod plays into the fuel efficiency?
 
I wonder how much your head mod plays into the fuel efficiency?

Unfortunately, I didn't get any exact nos. before I sent my head out. It was one of the first things I did. I've read on here that its good for 5-10% improvement.

Honestly, the gain in fuel efficiency from the head mod is a bonus. The real treat is that the power-band is smoother everywhere, idle is more consistent, and throttle response is better. I can pull a gear higher when I need.
Bottom line: It just makes the engine noticeably better everywhere. Thanks Ron!
 
Yeah its not that the you really see a reduction in fuel, you just use the fuel thats available more effectively after the head mod. You are achieving a cleaner burn that it more centralised around the spark plug. It makes things more consistant. In some aspects your bike will be making more power so where you would have had run at 3/4 throttle you might now be happy at 1/2 throttle. This also helps save on fuel. Clean jetting top to bottom is the number 1 fuel saver, and imo the head mod helps to achieve this much easier.
 
Back
Top