Head Squish Article Questions

FFRDave

New member
I read the tech article on head squish. I am seriously about to go home and take that measurement.

I noticed that the solder strand was placed on the piston going from left to right with a little hump extending forward in the middle.

It was suggested that this measurement should be done a couple times.

Shouldnt I take a measurement on the forward and back of the piston as well ? Why or why not ??

With regard to taking more than one measurement, I am concerned about the repeated assembly and disassembly of my head from the cylinder. Would I really need to fully torque the head bolts just for this measurement ? In this way, I think I might save some compression on my head gasket (o-rings). I could also simply order a new set of head gasket o-rings, but dont know if its necessary. Your thoughts ??
 
Last edited by a moderator:
Hi FRRDave,

It was suggested that this measurement should be done a couple times.

Shouldn't I take a measurement on the forward and back of the piston as well ? Why or why not ??

It is a very good idea to check this measurement three times. This way I can get a good average of the existing squish clearance.

No, do not measurement from front to back. The reason being that the crown of the piston can rock front to back on the piston pin pivot. This is why it is very important to lay the solder dead center across the piston and parallel to the piston pin (left to right).

The reason for bending the solder to a camel hump shape is to help stabilize the solder and keep it from moving on the piston as the ends rub against the cylinder wall as the piston moves up and down when rotating the crank back and forth at TDC.

It is a good idea to put a dab of grease or Vaseline on the hump shape to help hold the solder in place on the piston.

With regard to taking more than one measurement, I am concerned about the repeated assembly and disassembly of my head from the cylinder. Would I really need to fully torque the head bolts just for this measurement ? In this way, I think I might save some compression on my head gasket (o-rings). I could also simply order a new set of head gasket o-rings, but don't know if its necessary. Your thoughts ??

No Dave, you do not need to torque the head each time, just make sure they are snug and tight by hand.

Also remove the o-rings from the head before performing the tests as it will not matter with solder test.

Thank you,
Ron
 
Great.

I will check the compression a little later tonight, and do the Squish measurement.

You have an E-Mail RBD.
 
I have an old compression tester. Its a Craftsman and has been unused in a zip-lok bag for the past 7 years.

My tester indicated 140 PSI.

I prepared by fully warming my engine and then removing the fuel tank and installing the tester into the plug hole. I opened the therottle and kicked several times. (I did not put any oil into the sparkplug hole)

Its very warm and humid today, and I am about 500 or 600 ft. above sea-level.

My bike is a brand new 2005 Gas gas EC 250 with less than 40 hours.
 
I called Les and asked him for input on this... Even with the low hours on your bike, your rings might be worn if you were "sucking dirt". Start by getting a good baseline reading without putting a light oil in the cylinder (Ron recommended wd-40). Hold the throttle wide open and kick it as hard as you can repeatedly and note what the guage peaks out at.

Then spray some wd-40 down the spark plug hole and repeat the process. If the reading goes up measurably - it would indicate worn rings, so plan on replacing them while the top end is apart (and check the condition of piston & cylinder, etc.). Note this higher compression reading and send it along with your cylinder to Ron.

Les also said two different guys will get two different compression readings and that it was best to get a baseline when the top end is fresh and then monitor compression as the engine wears. A 10% drop in compression from the 'new' value would be a good indication to freshen the top end, etc.

Ron might have something to add here....

jeff
 
I went and bought a brand new compression tester. It wasnt a Snap-On or MAC Tools brand, but my readings improved drasticaly.

It was 180 to 185 without a squirt of oil and 190 MAX with a squirt of oil as measured by the new compression tester. These tests were done with the engine somewhat cooled down. I had it all heated up when I tested with the first (older) tester. Because I had taken the tank off, and did not warm the engine before my second set of tests (a half hour to 45 minits after the first set) the compression testing was done on a somewhat cooler motor.

The bike runs crisp and fast with no detectable power-loss problems.

The sparkplug electrode was a medium brown colar, but was dry when I pulled it. The threaded part was moist and black.

Ill go get some solder wire tonight after work and get my squish measurement.
 
FFRDave

I have an old compression tester. Its a Craftsman and has been unused in a zip-lok bag for the past 7 years.
My tester indicated 140 PSI.

I went and bought a brand new compression tester.
It was 180 to 185 without a squirt of oil and 190 MAX with a squirt of oil as measured by the new compression tester.

This is an example of why I say "use a good know and good quality compression tester". The average compression tester is only as accurate as the quality of it and how it is used.

One of the biggest problem with compression gauges is age, which can effect the rack and pinion of the gauge it self. Also the condition of the hose and sealing o-ring that seals the adaptor to the spark plug hole can become a problem, along with the check valve (they are the same thing that is used in wheel valve stems) getting dirty and leaking (these can be removed and cleaned or replaced).

Compression testing is subjective and can vary between users and equipment, but it can also be a good base line to evaluate things.

Again I can not stress enough, the quality of the gauge and how it is maintained and used. Compression tests need to be repeated several times to assure that you are doing it properly and getting consistent readings. It is hard to do compression tests on kick start engines as it depends on how long and hard you kick.

Just remember that compression testing can be a good tool if preformed properly and using a good known compression gauge.

Ron
 
Case in point

A point proven by a real world case.:cool:

I knew from the start that my tester was 'suspect', but tried it anyways. If my reading had been 180 or 195 I would have taken that as a reasonable test result. My test came in lower than expected (140). A compression tester (I would expect) will fail low. If its broken, its not gonna read higher.

When my reading came in too low, I got another tester. I spent about $50.00 and got a reading that was more in line with what I expected. Im not gonna shell out hundreds of dollars for an instrument I will only use occasionaly. My $50.00 tester gave me the performance I needed, and I am happy with that.

I did a total of six checks. Three without an oil squirt, and three with a squirt of oil.

:)
 
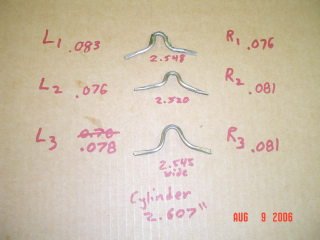
Today I removed the head and measured my squish band. Here are some of my observations:

The coolant was a clear fluid rather than the green stuff I am used to. Will the Green anti-freeze hurt anything ?

The O-Ring head gaskets are very small. When I placed them back inI had to use a dab of grease in the groove to help hold them. The smaller one was most difficult, but finaly stuck after I used the grease trick on it. I hope this wont do any damage. I did wipe the center of the water-jacket with my finger. Each bolt was torqued to 13 NM and then each was torqued to the required 25NM. I made a new gasket for the thermostat housing, and torqued it to 5 NM and then 10 NM as required.

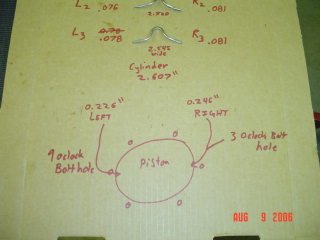
The Squishband test went OK, if not a tad rough. I used .125" or 1/8" resin-core solder. It took a couple tries to get it to the correct width across the middle of the piston. Then, when I tried to compress it, I had to use my foot on the kicker. Then, when the kicker finaly squashed the solder the kick starter lever went down before I could get off of it, resulting in the piston rising and falling through several (2 or 3) complete revolutions. My wires did not stay in place during this process. I hope I didnt get it caught in the exhaust or intake ports.:eek: I dont need any chunks of solder rattling around in there:eek: I measured each, and they are very close in width.

I will attach a couple photos with my numbers written on them.
 

Attachments

  • GGsquish 056.jpg
    GGsquish 056.jpg
    15.2 KB · Views: 65
  • GGsquish 058.jpg
    GGsquish 058.jpg
    15.3 KB · Views: 48
Last edited:
FFRDave said:
The Squishband test went OK, if not a tad rough. I used .0125" or 1/8" resin-core solder. It took a couple tries to get it to the correct width across the middle of the piston. Then, when I tried to compress it, I had to use my foot on the kicker. Then, when the kicker finaly squashed the solder the kick starter lever went down before I could get off of it, resulting in the piston rising and falling through several (2 or 3) complete revolutions. My wires did not stay in place during this process. I hope I didnt get it caught in the exhaust or intake ports.:eek: I dont need any chunks of solder rattling around in there:eek: I measured each, and they are very close in width.

Kicking the enigne over is likely to give you questionable squish measurements since you in effect hammered the solder instead of slowly squishing it.

It works far better if you slowly rotate the flywheel by hand.

You don't need the o-rings in to do the squish check.
 
Engine rotation method

Will I need a strap wrench and a 20 foot long cheater ? :eek:

I made sure the piston was coming up (compression stroke) when I placed the solder on. Then I carefully moved the kicker until it stopped. Then I applied pressure with my foot on the kicker until it completed the stroke through TDC.

After TDC, the piston did rise and fall in the cylinder a couple times. I was a little worried about a chunk of solder being sheared off in the cylinder ports. I think I lucked out because I measured the length of each of my solder strands and compared to the total diameter of my cylinder. The solder strands were all pretty close in length. I was using .125" solder. I think I may want to try the thinner 0.093", as this may bind less.

The tech artical should probably suggest the preferred engine rotation method in order to help the clueless (like me) who try to do this measurement.
 
Last edited:
Stop !

Just a quick reply for now.

DO NOT use the kick starter to rotate the crank shaft when checking squish.
Use a wrench or socket on a breaker bar on the flywheel nut and just rock the engine back and forth over TDC.

There is absolutely no need to move the piston any lower than 1/4" below TDC.

Rotating the piston blow the ports is NOT recommended.

I will post more on this at a later time.

Thank you,
Ron
 
FFRDave said:
Will I need a strap wrench and a 20 foot long cheater ? :eek:

I rotated the flywheel by hand to squish the solder. Go slow and apply gradual pressure. It yields quite easily.
 
Thanks Dave,
Ron sent me some updates for the article to clarify rotation of the crankshaft while performing this task. I updated the article with his edits. Please take a look and PM myself and RBD if you think it needs further clarification.

I encouraged Ron to put this article together and even helped him write a rough draft to get him going (so you can partly blame me!) I did this because I do think this is a "must do" mod on the bike. It makes it run much cleaner and more efficient. No downside. Given this, and Ron's reasonable pricing and extremely high quality of work - it is a no-brainer...

jeff
 
Yes, Thankyou. I totaly agree.

I look forward to a machine that runs at the top of its game. I am confident that I will like the results.

One huge reason why I post my exploits here is for the purpose of providing a "lessons learned" for others like me. I believe that there are many shade tree mechanics who own a GG and when they find this artical on how to do a Head Squish measurement they will want to try it. In the process of sharing my goofs, I may lose some credability, but I gain the knowlage that someone like me is out there thinking "sure glad I didnt turn that motor with the kicker", even though he will never admit that he planned to use the kicker.


I will try again later tonight when Im off work.

Thanks again for taking my troubles to heart. Now Im gonna tel you about my ex-wife:eek: ... Just kidding:D
 
Thanks everyone for all of your help.

The second attempt went much better.

The engine rotated much easier by turning the 18mm fly-wheel nut. A person could really have grabbed the fly-wheel by hand and turned the engine over TDC quite easily. It takes removing only four 8mm bolts on the plastic fly-wheel cover to expose that 18mm bolt.

I was easily able to rotate the piston up and over TDC both forward and backward to get maximum squish on each of the four strands of 1/8" solder.

Why does it take so much more force to turn the kickstarter lever than the flywheel ?
 
Mechanical advantage through Gearing. Or in this case Disadvantage. When you kick the starter it turns the engine over a few times, where as the flywheel is on a 1:1 ratio, . . Funnily enough.
 
RB Designs did me right

I love my Gas gas !!

Now I love it more. I have another post in the Product Reveiw section.

Its well worth the cost.

I love my Gas gas !! :D
 
Back
Top