blitz11
Silver Level Site Supporter
Rebuilding the old girl
Maybe relevant. Maybe I am an idiot.
I haven't ridden much in the past 5 years. Last serious ride was the Shane Watts school in 2014 with my daughter ( a complete blast, except my bike had an intermittent ground problem, and i looked like an idiot when it would die unexpectedly (only happened at school - go figure.))
Anyway, moved to Montana. ALL of running/bicycling speed goes away. Altitude? Nope, bad heart valve. Mortality and all of that.
Anyway, kids are out of college, and i decide to start riding dirt bikes again. (My daughters were my riding buddies - riding w/o them wasn't as much fun, so college meant not much riding.)
So, what to buy? Sort of had it narrowed to a GG (new 2018 model) or a Yamaha YZ250X (read good things about it here). I was looking at new gassers, and found a "Transformation kit" for the 2002 EC 300 (gasgaspartsguy.com = Thanks Brad and Bud! ).
i ran some numbers, and checked my inventory of GG spare parts i have accumulated, and thought, "what the heck - let's try the transformation kit."
I am not a very good rider, so i don't know how much a new bike will help. So, let's try to fix the old one.
GGpartsguy ordered me one up, and it arrived about 5 weeks after the order - from Spain.
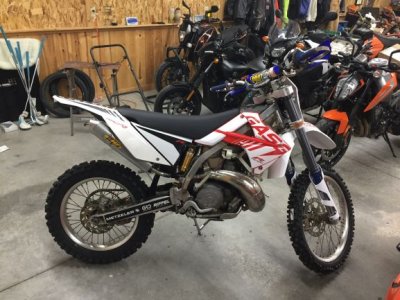
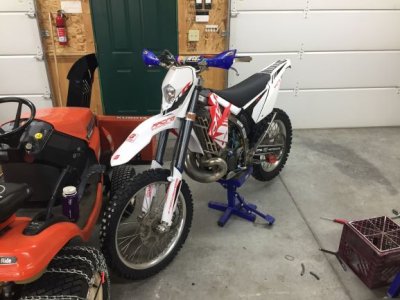
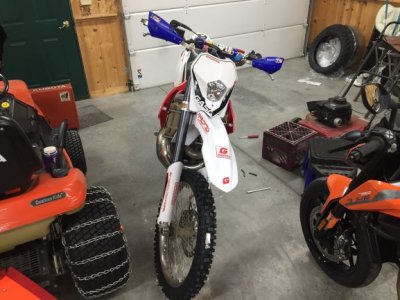
1. The good: I am not yet done with the bike as I am refreshing the suspension, but it is going to look great. (Thanks to Steve Beane at afterhours cycle and Terry at Northwest Suspension.) The kit comes with Graphics, red radiator shrouds, and white fenders. Everything is pre-stickered, but the kit comes with additional radiator shroud graphics. I thought that i would wait to install the new stickers; I will do that after i wreck those that came on it. It also came with swingarm stickers - nice.
2. The bad. This kit is a complete pain in the a$$ to install. it fought me at every turn. I mean EVERY turn. Nothing went smoothly. If you're thinking about doing this, be close to a hardware store (my 2002 hardware didn't work with the new kit), and be ready to cut parts, hack plastic, machine spacers, etc. You have to use your old airbox boot, and that turned out to consume a ton of time. The new seat doesn't fit the 2002 - i had to cut quite a bit of the base away, and the front of the seat doesn't reach as far as it should.
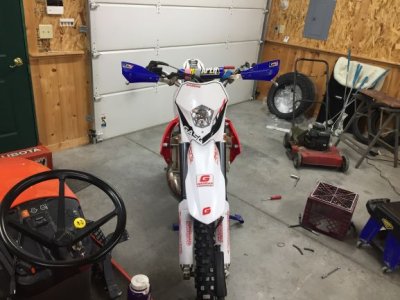
For instance, GG provides a headlight shell and an H-4 light, but no wiring, and no screws to assemble the parts to make it work. Luckily, i had an assortment kit of stainless steel pan-head sheet metal screws, which seem to do the trick. I had to modify the old headlight vertical adjustment to work with the new bike. It wold be worth an additional $50 to have all the nuts and bolts included. Ironically, the nuts and bolts and screws they did include didn't fit anything.
There was no place for the ignition box. I was going to make a shelf for it, but there was no room. Instead, i used some super high-strength velcro and velcroed it to the inside of the right side cover inside the airbox. Seems pretty tight - we'll see how it goes. I didn't have to lengthen any wires to do this.
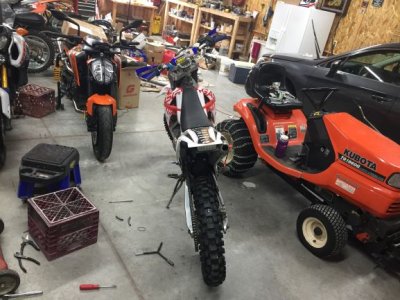
The new subframe is steel, and it fits pretty well. It's heavy, but at this stage in my life, i don't care too much. Seems pretty durable. It was finished in black, which sort of contrasts with the nickel-plated frame, but that's OK. i was too lazy to repaint it.
Anyway, i really like this bike, so now that it is almost done, I am sure i'll forget the pain of assemble/fabrication. I need to wire in a H-4 bulb socket and headlight switch tomorrow, assemble the shock with new parts, and install new springs, bushings, seals and wipers in the front fork when those parts arrive (Tuesday?). I can post pictures if anyone cares (if i don't need a photo hosting service.) Oh, i also have to spoon on some new tires which are here. Yee haw.
Thanks for reading. A 17-year old dirt bike looks like a new modern bike. who would have thunk?
Maybe relevant. Maybe I am an idiot.
I haven't ridden much in the past 5 years. Last serious ride was the Shane Watts school in 2014 with my daughter ( a complete blast, except my bike had an intermittent ground problem, and i looked like an idiot when it would die unexpectedly (only happened at school - go figure.))
Anyway, moved to Montana. ALL of running/bicycling speed goes away. Altitude? Nope, bad heart valve. Mortality and all of that.
Anyway, kids are out of college, and i decide to start riding dirt bikes again. (My daughters were my riding buddies - riding w/o them wasn't as much fun, so college meant not much riding.)
So, what to buy? Sort of had it narrowed to a GG (new 2018 model) or a Yamaha YZ250X (read good things about it here). I was looking at new gassers, and found a "Transformation kit" for the 2002 EC 300 (gasgaspartsguy.com = Thanks Brad and Bud! ).
i ran some numbers, and checked my inventory of GG spare parts i have accumulated, and thought, "what the heck - let's try the transformation kit."
I am not a very good rider, so i don't know how much a new bike will help. So, let's try to fix the old one.
GGpartsguy ordered me one up, and it arrived about 5 weeks after the order - from Spain.
1. The good: I am not yet done with the bike as I am refreshing the suspension, but it is going to look great. (Thanks to Steve Beane at afterhours cycle and Terry at Northwest Suspension.) The kit comes with Graphics, red radiator shrouds, and white fenders. Everything is pre-stickered, but the kit comes with additional radiator shroud graphics. I thought that i would wait to install the new stickers; I will do that after i wreck those that came on it. It also came with swingarm stickers - nice.
2. The bad. This kit is a complete pain in the a$$ to install. it fought me at every turn. I mean EVERY turn. Nothing went smoothly. If you're thinking about doing this, be close to a hardware store (my 2002 hardware didn't work with the new kit), and be ready to cut parts, hack plastic, machine spacers, etc. You have to use your old airbox boot, and that turned out to consume a ton of time. The new seat doesn't fit the 2002 - i had to cut quite a bit of the base away, and the front of the seat doesn't reach as far as it should.
For instance, GG provides a headlight shell and an H-4 light, but no wiring, and no screws to assemble the parts to make it work. Luckily, i had an assortment kit of stainless steel pan-head sheet metal screws, which seem to do the trick. I had to modify the old headlight vertical adjustment to work with the new bike. It wold be worth an additional $50 to have all the nuts and bolts included. Ironically, the nuts and bolts and screws they did include didn't fit anything.
There was no place for the ignition box. I was going to make a shelf for it, but there was no room. Instead, i used some super high-strength velcro and velcroed it to the inside of the right side cover inside the airbox. Seems pretty tight - we'll see how it goes. I didn't have to lengthen any wires to do this.
The new subframe is steel, and it fits pretty well. It's heavy, but at this stage in my life, i don't care too much. Seems pretty durable. It was finished in black, which sort of contrasts with the nickel-plated frame, but that's OK. i was too lazy to repaint it.
Anyway, i really like this bike, so now that it is almost done, I am sure i'll forget the pain of assemble/fabrication. I need to wire in a H-4 bulb socket and headlight switch tomorrow, assemble the shock with new parts, and install new springs, bushings, seals and wipers in the front fork when those parts arrive (Tuesday?). I can post pictures if anyone cares (if i don't need a photo hosting service.) Oh, i also have to spoon on some new tires which are here. Yee haw.
Thanks for reading. A 17-year old dirt bike looks like a new modern bike. who would have thunk?