Powervalve issue?

FYI guys. As mentioned before, we were having troubles with a poorly running 2011 EC250. By poorly running, it was weak off the bottom then hit really hard in the midrange and pulled hard right up to wide open throttle. Jetting helped but regardless of the jetting, the underlying problem remained. With Glenn's advice, I started looking into the powervalve and sure enough, it was not staying seated closed, even at idle, and would open as soon as I blipped the throttle.

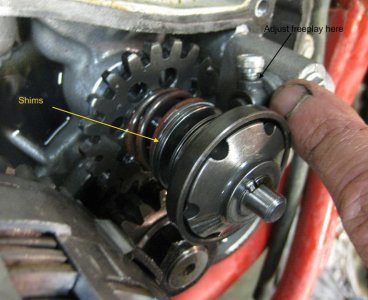
I ended up putting a 1.5mm washer as a shim under the spring in the governor under the right side engine cover. You don't need to pull the clutch over or waterpump cover but you do need to drain the coolant. It was pretty easy to do and now the bike performs as it should. It makes great bottom end and lugs down better than any other two-stroke on the market, yet will rev up and run with any 450 in the open stuff.

When I get time, I may try going to an even thicker shim just to see the difference. If you're looking for a shim, a washer the same size as the one that goes between the clutch basket and inner hub works perfectly.

Oh yeah, for jetting we're using a 172 main, 38 pilot, N8RH needle (KTM) in the 4th clip and air screw is 1.5-2 turns out depending on the temperature. Elevation is 2000-4000 feet. Once it warms up more I may drop the needle and switch to a 35 pilot jet.
 
It would make a nice photo tutorial sticky wouldn't it.

Mine has rattled on my 08 since new ,but the power has never been an issue So I have been living with the rattle.

It just sounds like alot of trouble to go thru to stop the rattle.
 
Its very easy. Takes more time to prep the case for a new gasket than to do the adjustment. Its a little strange that these are coming so far out of adjustment. What Steve did was preload the governer spring more. This altered the rest position of the mechanism and took up the free play, but also causes the PV to start opening at a higher RPM.
 
Honestly guys, it's not hard. I think the whole process took me half an hour and a good 5 minutes of that was spent looking for a suitable washer.
 
Super dooper noob question, but where abouts are you checking to see if the power valves are closed at rest? Do I have to remove the pipe and peek in from the ehaust port? or do you take the side powervalve covers off? Also, do I need new gaskets if I remove the sides?
 
Take off the right side PV cover and see if the actuator plate is resting on the stop or not.

I would do the adjustment I described before shimming anything, as it does not alter the PV opening curve. You can shim later as an experiment. Any time you add/subtract governer shims you change preload and starting position of the governer. I feel this should be accounted for in the adjustment, so the actuator is always at the stop with just over zero preload with the engine off. Otherwise, you can have a situation where the governer is in a partially open position at rest.

My camera died some time ago and I really don't have the coin to drop on a new one. If someone sends me a nice DSLR I'll do a very proffesional technical article on the subject.:D

Edit: The other thing that will change this adjustment slightly is the deck height of the cyl., as when you add remove base gaskets. If you have ever owned/wrenched on a KTM, they have a ball joint end on the PV rod that can be adjusted for length to account for this.
 
Is it possible for all of the ball bearings to be dislodged and hidden behind part #26. I have my cover off now and understand the adjustment procedure but I can't see any ball bearings at all.

Please help!
 
Do I need to take the waterpump impeller off to get the case cover off...didn't want to force anything.

Is it a lefty loosey or righty loosey on the impeller shaft?
 
You do not have to remove the water pump impeller to take the case cover off. The opposite end of impeller shaft sits in a bearing race and can sometimes be tricky to remove but it should pull straight out without having to remove the impeller itself.
 
Is it possible for someone to take a few more pictures and post next time they dive in. I'm a bit of a girl when it comes to tackling things head on for the first time.

I'll hit up the dealer for a few power valve gaskets and a clutch side one too.

I test rode a friends 2011 EC300E and immediately I realised just how rattly my bike is both at idle and when giving light revs at idle. Mine sounds like its going to explode compared to his. Then riding his, it felt much stronger right off idle. Mine definately had more hit in the mid and a ripper top end. Could be jetting variances but the rattle is definately not jetting related and has been there since day 1. I thought it was normal.
 
One more thing. When you say take the right side cover off and run the bike to ensure the governer is working as its meant to. Is this with the pipe on or off?

Is there any harm in firing the bike with the pipe off for diagnostic purposes?
 
Every time iv heard that pv check mentioned, its with the rhs cover off and pipe on, but it only takes a few seconds to put the pipe on, it just sits there, dont bolt it on.
 
Every time iv heard that pv check mentioned, its with the rhs cover off and pipe on, but it only takes a few seconds to put the pipe on, it just sits there, dont bolt it on.

Thank noobie. Will have a look see. I have pulled my P3 Guard off so will give the pipe a good clean while its off. Going to throw some fresh o rings on it too. Big thanks!

Had a look.. Powervalve is against the stop. Seems to be quite a bit of play where the arm attaches to the actuator plate. There is a floating washer in there that vibes alot. Still couldn't pin point the sound my engine makes just off idle. If you give it a quick rev theres quite a bit of vibration felt and heard. Pulling the choke and making it super rich doesn't change it so I don't suspect jetting. Are some of these engines just noisier than others? The one I compared to only had 600km on it, but I recall mine always being a bit loud and vibey
 
Last edited:
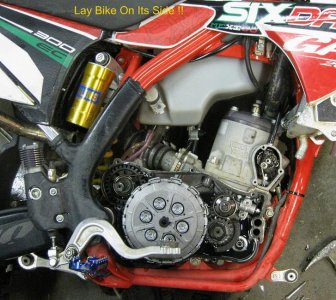
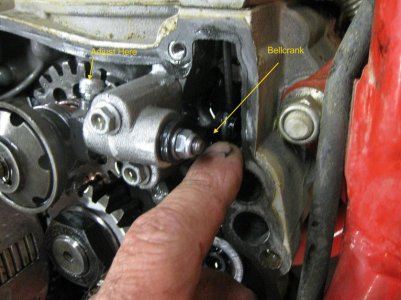
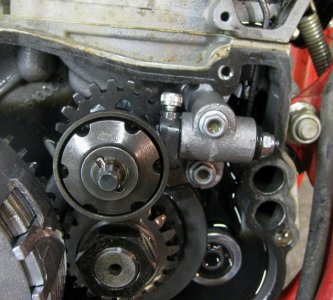
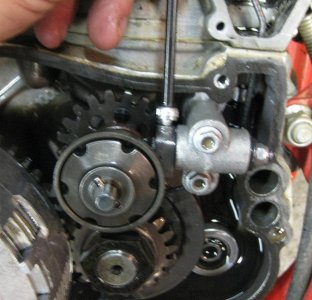
Here are some photos of the adjustment being done to my bike. I can't provide a detailed description of the procedure since I don't know the names for most of the parts, but I wanted to get some photos posted so people could see the powervalve mechanism. You'll need to remove the pipe, kickstarter, drain the coolant from the water pump drain plug, remove the radiator hose (use pliers to squeeze the spring clamp) and lay the bike on its side. Remove the side case by loosening the appropriate bolts. You will need to remove some of the clutch cover and water pump bolts because they hold the side case on! These bolts will be noticeably longer than the others and they must be removed. Tap the case lightly with a rubber mallet to loosen the gasket. Lift the case off, it may take extra nudging near the water pump area because of the drive mechanism. Now look at the photos. The bolt marked "adjust here" is the screw that you need to loosen. The next part is tricky, you need to follow Glenn's advice and figure out which way to rotate the adjuster (and how much) to get rid if the slop. You'll need to use both hands to hold everything in place while you re-tighten the Allen bolt as everything can flop around when this bolt is loose. I did not change the shims on my bike. Now you can reassemble the bike (new side case gasket goes on now if needed) and replace the coolant.

Steve
 

Attachments

  • PV_1.jpg
    PV_1.jpg
    104.3 KB · Views: 1,354
  • PV_3.jpg
    PV_3.jpg
    78.1 KB · Views: 1,359
  • PV_2.jpg
    PV_2.jpg
    75.3 KB · Views: 1,330
  • PV_4.jpg
    PV_4.jpg
    61.8 KB · Views: 1,323
  • PV_5.jpg
    PV_5.jpg
    66.7 KB · Views: 1,603
Thanks heaps for those pictures!

I inspected my power valve through the right hand side cover and its operating well. There is still a bit of play in the valve itself while the actuator is up against the stop but I believe this is normal.

I made a jetting change afterwards to try and identify the source of my rattle and vibration and low and behold, dropping the needle one more clip position cleaned it up alot, but I'll put that in the 2 stroke carb section.
 
Back
Top