Powervalve issue?

Hold/jam the PV actuator plate up on the cyl closed.

Preload the PV governer spring with a .005" to .010" feeler gauge (not that critical). I used to do it by feel but this is easier and consistent.

loosen the setscrew on the bellcrank

Push/hold the governer assy fully into the case bearing, be sure its straight, and
tighten the setscrew

Remove feeler gauge and replace the side cover

The idea is to remove all freeplay and end up with just a VERY SLIGHT preload, so the actuator is held to the stop.

I checked mine this evening and it was pretty sloppy.
Initially, I could move the P/V actuator about 7mm before I could feel the spring tension.
 
On a second note, anyone realize that the bearings in there are interchangeable with rollerblade and skateboard bearings? :D

Yep. Picked up some 6000Z and 608Z bearings from the local bearing shop and he asked if they were for a skateboard. lol
 
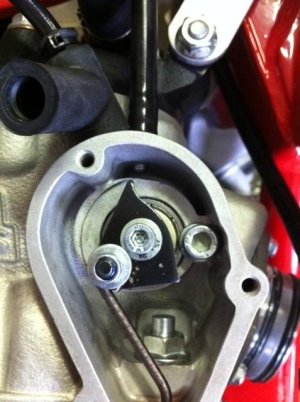
Hi guys, i have just checked my PV and not sure if i need to adjust it, i have attached a couple of pics, the Actuator plate is against the stop but there is a bit of slop approx 4-5mm I before i feel tension, is this normal or should i adjust all free play out. I have heard a bit of a rattle at low speed and had some jetting issues, i have a Trusty Adjustable power Valve to install but want to have the bike running perfect before i install it.

004.jpg


003.jpg


Kirkyshow007.jpg


2010 CC250
 
From your pictures (& I'm no expert) it doesn't look like it's tight enough against the stop. As I understand it needs to be resting against the stop (allen head) with about .005-.010 tension on it. That's why you use the feeler gauge in GMP's directions.
 
Last edited:
Assuming that all the play shown is free and not against the PV governer spring, its sloppy and could use an adjustment. Remember this has nothing to do with free play in the flap/drums/rods, that is fixed by design and tolerances. This adjustment is like a reset to absolute zero position, at zero RPM. If its grossly off, like it was in my '03, the PV floats around rattling on the stop, and starts to open too soon.

Its like setting up a KTM PV after a top end R&R if you have ever done one, except there is no adjustable heim joint at the actuator, the bellcrank position/setscrew does the same thing.

Keep in mind that overall deck height effects this slightly. If your bike came with a big stack of base gaskets, and you removed all but one .3mm, the PV rod height in relation to the cyl in now higher and you will now have slightly more PV offset in the open direction. KTM makes a bigger deal about this and adjusting for it, but their PV is different. The GG PV is simple and tough, and its impossible for the main flap to hit the piston at any position. Perhaps the variable is from the factory setting the bellcrank position in the lower ends to a fixed spec, and then as they add top ends and various base gaskets to suit a desired compression level, the final overall PV starting position may not be absolute zero.
 
New PV install

I have a brand new '11 250EC but wanted a 300 so the dealer gave me a 300 jug to swap for the 250:)

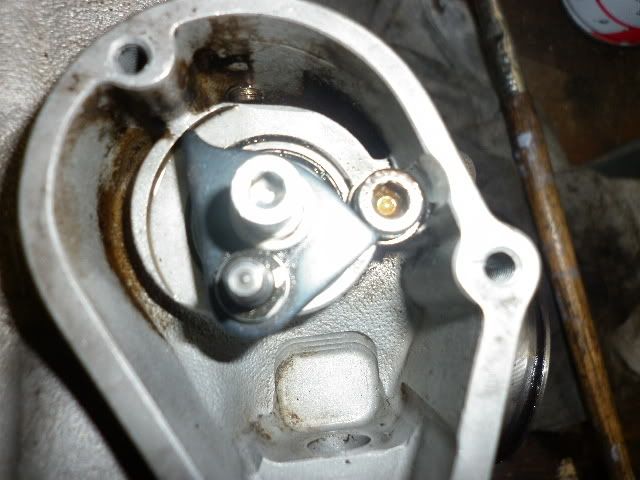
I have stripped the original jug and installed the PV and to 300cc jug on the bike. There didn't seem to be any space between the actuator plate and the hex stop when installed on the 250, but now my PV actuator looks like the picture
powervalveplate.jpg
Is the space between the lower right point of the actuator and the bolt the "slack" that is being talked about and needs to be adjusted out? Could changing from 250 to 300 have caused the gap to open up?

I'd like to clarify the directions for the adjustment:

"Hold/jam the PV actuator plate up on the cyl closed"....not clear on this...is this the longer point of the plate i.e. the "top" of the black triangle against the top of the hex bolt stop (flapper up and exhaust max open) or is it the lower right short point of the black triangle against the bottom left of the hex (flapper max down and exhaust max closed)?

I take it to mean the latter and that the PV flapper in the exhaust port should be maximally closed....CORRECT?

I'm not sure if I'm trying to elimnate the space between the lower right point actuator and the hex bolt stop with the motor at rest.

With the space seen in the photo attached, I take it to mean that my power valve is not closing all the way and will be open at lower throttle settings.

Confused:confused:
 
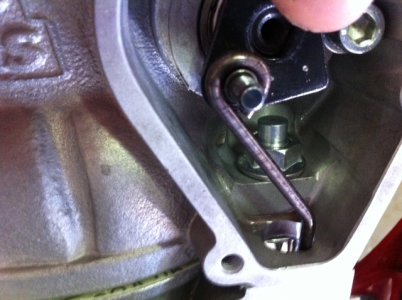
You are correct. You want the lower right hand part in your picture to be up against the bolt/stop while the bike is at rest which is also = power valve fully closed. I don't have the arm connected in this pic as the jug is on the bench top, but thats the position you're looking for with the bike at rest, everything assembled. You want enough tension on it so that it holds itself there under idle.

P1000232.jpg
 
Thanks

....and the preload on the governor is to provide just that, correct? Where do I insert the shim or feeler gauge for the preload? Between the shims and roller bearing beneath the ball and ramp (Rekluse:D) assembly of the governor?

How do you ensure the flapper is fully down? Just visually or is full down defined by the orientation of the D shaped slot in the actuator plate when pressed up against the hex bolt stop......

ahhhhhh....I think I am starting to see now.

Thanks
 
Problem Identified

pushrod.jpg

After slacking off the set screw, I still could not get the actuator plate to contact the hex bolt (you can still see the gap as I am attempting to seat the plate to the bolt)....next, I removed the rod end from the belcrank entirely and found that the resistance was coming from the pushrod binding on the passage between the powervalve chamber on the side of the cylinder and the chamber under the right side cover......you can see that in the photo too.

Solution seems simple enough.....just bend the rod so that it no longer binds and has full travel!

I just want to make sure I'm not missing something here....I checked the fiche and 250 and 300 use same rod and belcrank so I think maybe I bent the rod removing the 250 jug.....should be no problem to just bend it back....right?

Glad I stumbled on this thread or I wouldn't even have thought to check it and been running my bike with a stuck powervalve and not even known the difference!

Thanks for any comments....feeling like I need some reassurance here before I fire up a brand new motor.
 
My pushrod also touches the outer edge of the hole in the cylinder. It shouldnt bind. I haven't had my side cover off to know much about the setup downstairs, but I believe thats where you set your position and tension. You could bend the pushrod a little but thats kind of the back door fix.

The powervalve will be at fully closed when the actuator plate is hard up against the bolt head. and fully open at the other end.
 
thanks again

I took the case side off and fully reworked the rod shape......I can't believe how much it was binding:confused: I KNOW i did not do that when I removed the cylinder.

2 years of ortho wire bending courses in dental school and building dozens of RC airplane models with Z bent servo pushrods came in handy. No binding. Smooth actuation. Now I will set preload and button her up.
 
Where your balls in place too?? Pulling on the pushrod can sometimes dislodge the balls in the governer too while will make it sit awkward and bind up.

I took the case side off and fully reworked the rod shape......I can't believe how much it was binding:confused: I KNOW i did not do that when I removed the cylinder.

2 years of ortho wire bending courses in dental school and building dozens of RC airplane models with Z bent servo pushrods came in handy. No binding. Smooth actuation. Now I will set preload and button her up.
 
Balls were all good though I did remove and disassemble the governor to confirm and also to familiarize myself with it's operation. I'm certain I didn't pull on the pushrod hard enough to either bend it nor dislodge the balls. That was confirmed to me when I was actually intentionally reshaping it....it took very deliberate force to deform it (meaning correct it).

This whole thing makes me wonder if a lot of the "jetting" issues I have heard people struggling with around here could be related to malfunctioning or unadjusted PV action. Just a thought.

Anyway, I'm glad I got that all out of the way before trying to start jetting.

Thanks for your help.
 
I had one of the power valves that was WAY out. Really thought GasGas had decided to not worry about low end and go for a harder hit...read through some posts...checked mine out...struggled mightly with a supplier of inner clutch cover gaskets...MIGHT be the best bike I have ever ridden now. Not just the best I have owned...best I have even threw a leg over! WOW.

I was all set to send the shocks to LTR but perhaps they are valved for fat asses?? Who knows such things??

All I need is a stabilzer and new tires and I am DONE. Truth be told I prolly don't need a stabilizer with this, but it is the only way I can think to make it better. It is borderline wheelie happy, but that helps with logs etc.

I love it.
 
Great news. I don't know if the powervalve is the cause for all the jetting woes though. Mine has always operated within spec but always been a bit weak right off the bottom. 2.6mm squish is the underlying cause for me.
 
I'm sure you are right. I was being a little cheeky.

I fired up the bike on the weeknd and heat cycled it. I ran the JD baseline recommendations (180M, 40P and 4th clip on red YZ250 needle). I ran 40:1.

Holy rich. Bike was gurgling and belching smoke. little bliups of throttle would cause the RPM to rise and stay elevated for a few seconds after throttle had returned to zero. Jetting is WAAAAY off. That said, I will run it rich and with extra premix for a tank to break in, then go to 172M, 38P and 2nd clip.

I know this isn't a jetting thread, so I'll sign off and join into one of the dozens of those going on here.
 
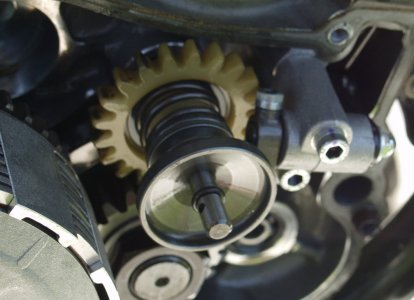
Can someone please explain or post a picture showing which part is the 'governor spring' where the feeler gauge goes? Governor Assembly?

I adjusted the pv actuater too tightly my first time around. the assembly was so tight that my top end was cut short, losing overrev.

I would like to do it right this last time. I dont know where parts fiches for gasgas is, this would help in identifying each part so I can follow what GMP means.

Thanks
 
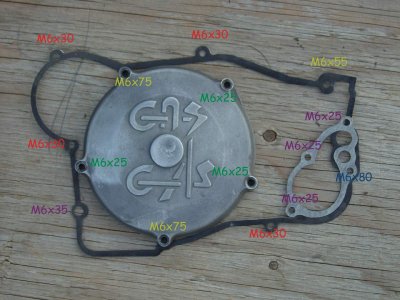
Remove the side case by loosening the appropriate bolts. You will need to remove some of the clutch cover and water pump bolts because they hold the side case on! These bolts will be noticeably longer than the others and they must be removed.

Steve

You can see here which bolts you might be able to leave in place.

-Dean
taking lots of pictures while I'm in there.
 

Attachments

  • Clutch-side-cover-bolts-web.jpg
    Clutch-side-cover-bolts-web.jpg
    124.5 KB · Views: 353
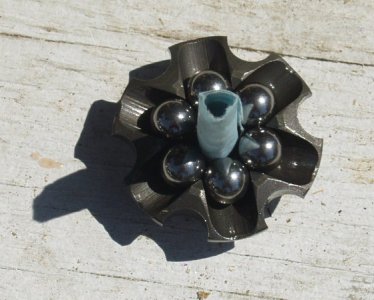
Here's what the infamous Governor's Balls look like.

The blue thing is just paper to keep each ball in its ramp for the photo.
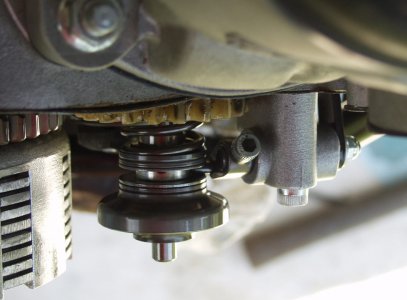
If it's not obvious in the photo, the cup where they ride in the No Balls photo has a similar ramped shape. Actually, you can see that pretty well in the spring from above photo.

I'm going to doctor up the from above photo and post where I'm guessing the feeler gauge might go. Also, I think my rod has Zhack Slack Syndrome and might need a minor straightening. More on that later
 

Attachments

  • Power-Balls.jpg
    Power-Balls.jpg
    96.8 KB · Views: 1,242
  • No-Balls.jpg
    No-Balls.jpg
    120.5 KB · Views: 617
  • Governor-Spring-top-view.jpg
    Governor-Spring-top-view.jpg
    118.1 KB · Views: 622
Back
Top