S3 Race Custom Modified EC250 Complete Rebuild

Hope it solves it for you F5.

Things went reasonably well this arv. Wasted time putting the water pump cover back on. Had to come back off to access the front engine mount. Needed a deep socket to do up the lower engine mount too. A second set of hands would have been great for this too. Swingarm pivots lubed and slipped in easily. I had some dramas with the water inlet on the head. Over torqued using the torque wrench to specified reading but ended up crushing the gasket in one side where it wouldn't click (so technically didn't over torque, but too much for the thick gasket). Have some spares so slid in a thinner one and then had to change out the bolts for shorter ones as they'd bottom in the head before torquing down on the fitting. Then finally got there, hooked up the hose lines and then filled with coolant only to notice a pretty steady leak coming from this area. Not sure if I've got another bad gasket or an issue with the hose. Will investigate more tomorrow.
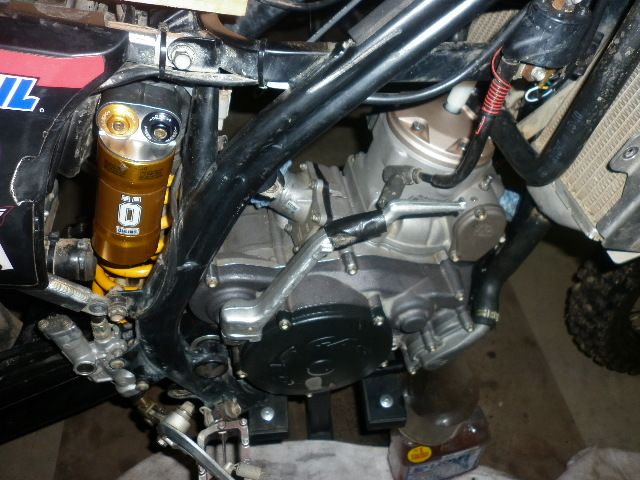
P1010239_zps696e29e9.jpg
 
Not much on those M6 bolts, 6Nm. Needed shorter bolts? I've used ThreeBond on spigots and never had an issue, but Ahh, you have the S3 head.
 
Yeah the S3 head. I'll just snug them up by hand tomorrow. I've got 4 more of those litte gaskets in my spares kit too. No real issue.
 
One more thing Glenn, while talking torque values. I followed the workshop manual and that said 40Nm on both the pri drive crank nut, and the clutch hub, with loctite. Just checked my Yamaha manual and in comparison it asks for 75Nm on the clutch and 110Nm on pri drive nut. Thats a pretty massive difference, and here I was worrying I may have overtorqued the pri drive with the electric impact the first time around.

So will it be ok with the 40Nm and loctite? Clutch is ok. Its got locking tabs, but don't want that pri drive coming undone. I assume it would have been torqued to 40Nm at the factory, and it was hard to rattle off.

Edit: I have a bad feeling I'll have to drop the oil and pull the RHS cover off her again.. At least the coolants already out.. Searched and 98Nm is what you suggest for the pri drive. Can I get away with 40Nm on the clutch? I think I'll have to buy another lock washer if I have to bend it back again, and that was a horrible job!
 
I swear I've done everything 3 times with this bike.

Oil dropped again, side cover off checked the torque on the pri drive. Its tight! I locked the gears and put some considerable effort into trying to snug it up and shes not going anywhere. Based on that I left the clutch as it was. Ended up back in there again after double questioning myself if everything was right. Doubt is a horrible thing! Bike is back together all but the brake pedal, seat and tank. I'll kick it in the guts tomorrow.
 
Jake,
A caution on the use of Loctite: If you recheck a locitited fastener and it moves a tiny bit from the extra torquing, the bond has been broken.

Correct torque is necessary so the fastener does it's job; the loctite is there to keep the fastener in place (holding it at the torque value).
Neil
 
Jake,
A caution on the use of Loctite: If you recheck a locitited fastener and it moves a tiny bit from the extra torquing, the bond has been broken.

Correct torque is necessary so the fastener does it's job; the loctite is there to keep the fastener in place (holding it at the torque value).
Neil

Thanks Neil.

I don't think it even moved when I went to tighten it up more though. What I'll probably do is order another RHS gasket and just double check it when I do my next oil change.

Is there any issues with removing the pri drive nut while the rest of the engine is assembled?

What sort of a poxy workshop manual lists torque values that are so far out?
 
If the nut is "most of the way" to the correct torque and it's loctited, you are probably OK. If we take 110 NM x .74 = 81 ftlbs and you've got the nut at ~60 ftlbs, the primary gear will be held in place. The real problem occurs when there is no loctite and the nut spins out hitting the cases.

In your situation you should be able to do some riding and prove out all the other work, then later pull the cover and redo the primary nut. If you are worried don't hammer on the bike too much on the first ride. You'll likely do a few heat cycles and some easy riding anyway.
 
I've gone with your advice Neil. I had the bike so far reassembled that I couldn't bring myself to pull the side cover again for the 4th time. I'll give the bike a few hundred kms (maybe 3 easy rides) and then when it comes apart for the suspension service and revalve I'll have the pipe off anyway and subframe flipped so it'll be the perfect time to check the nut out again.

It took a few kicks to get the bike started up and it blew smoke like a chimney. Probably a combination of some overflow fuel from the lectron when lifting it off the stand, having the choke on, and extra assembly lube. Bike came up to temp really well. No coolant or oil leaks. Most noticable was the reduction in vibrations. Heaps better than it was! I didn't follow any particular break in method. Just rode it around under light loads or throttle for a bit until the upper rad was warm to touch and then cleared her throat a bit. Avoided any constant rpm and just tried to keep some load on the engine to help bed the rings in. Varied rpm up and down through the gears. The engine felt very willing to take the throttle and pulled clean from bottom to top. Ran some tight ST nearby which is mostly overgrown and good there too. Then to finish off took the young bloke for a couple of laps around the yard.

Next mission is to fit a new rear tyre and then decide if I want to upgrade the plastics to 2011 spec.
 
Jacobi
Just to clarify.
The nut to hold the clutch basket and hub...
What is it to be torque to?
And did you loctite it?
Thanks
 
Last edited:
Jacobi
Just to clarify.
The nut to hold the clutch basket and hub...
What is it to be torque to?
And did you loctite it?
Thanks

I'd be aiming for 70-75Nm with blue loctite.

I didn't get this tight though due to the workshop manual specifying lower. I'm not too concerned with it though as the loctite and locking tab should hold it all in place quite well. I'll be going back in 10hrs and doing it properly once I get a couple spare locktabs. I dont want to reuse the one in there a 3rd time.
 
Anyone know what lock tabs from other bikes will fit? Between maintenance on the two bikes I wanted to order a dozen or so to have in the parts bin.
 
Ne
Anyone know what lock tabs from other bikes will fit? Between maintenance on the two bikes I wanted to order a dozen or so to have in the parts bin.

Please don't hold me to this, but if you ever take the time to compare part #'s Rekluse website, technical support, parts fische..
http://www.rekluse.com/parts_listing.shtml
Some clutch components of CRF450R crossover including the Center Clutch Tab Washer....
So my guess is yes.....
 
I was just going to order a handful of oem ones for the same reason. Handy to have a few spares! Just need to decide what else to get at the same time.

While on the topic. Anyone have any tips on the best/easiest method to fold the tabs up? I used a set of long nose pliers to bend it up as best as possible and then a screw driver/punch to get it up against the nut.
 
I use a small chisel to get it started, then finish with channel locks.


Sent from my iPad using Tapatalk HD
 
I was just going to order a handful of oem ones for the same reason. Handy to have a few spares! Just need to decide what else to get at the same time.

While on the topic. Anyone have any tips on the best/easiest method to fold the tabs up? I used a set of long nose pliers to bend it up as best as possible and then a screw driver/punch to get it up against the nut.

I have a set of 90* waterpump pliers that work well for these operations. A screwdriver only works if you have room to get from the side, but I have found that the pliers provide unfettered access due to the angle. Probably wouldn't use straight or a mild angle, as you need to get right to the side of the nut and washer.

Something like this.
 
Hope it solves it for you F5.

Things went reasonably well this arv. Wasted time putting the water pump cover back on. Had to come back off to access the front engine mount. Needed a deep socket to do up the lower engine mount too. A second set of hands would have been great for this too. Swingarm pivots lubed and slipped in easily. I had some dramas with the water inlet on the head. Over torqued using the torque wrench to specified reading but ended up crushing the gasket in one side where it wouldn't click (so technically didn't over torque, but too much for the thick gasket). Have some spares so slid in a thinner one and then had to change out the bolts for shorter ones as they'd bottom in the head before torquing down on the fitting. Then finally got there, hooked up the hose lines and then filled with coolant only to notice a pretty steady leak coming from this area. Not sure if I've got another bad gasket or an issue with the hose. Will investigate more tomorrow.

P1010239_zps696e29e9.jpg

Jakobi
I see you have the YZ kickstart lever installed.
Do you like it better than the OEM?
It looks as though is is longer than OEM?
 
Its a much better fit Stu and much sturdier. Worlds apart. I should have done it sooner.

I have a vacuum pump arriving in the days ahead and will be servicing the TTX front and rear (revalve) within the next month. New plastics front to rear incl 2011 headlight and fender with Cerventes replica stickers! and a billet APT smartcarb on the way! :D I better keep this girl for another few years..
 
Another 2 weeks wait on the vacuum pump. Then hopefully the suspension thread will start.

Back on topic here. I was hoping to get out for a casual ride on Weds and may still manage that yet with some shuffling of parts or a loaner bike. Will have a better ride report after that.

I've also ordered a deflecting beam style torque wrench and will go back through the clutch hub and pri drive in 10hrs time when changing out the tranny oil. I'll hopefully have my 2011 cervantes plastics, apt smart carb, and vac pump ready to rock by then.
 
Back
Top