Newer Plastic on Older GasGas show your bike

I only meant it would be overkill because I'll have a total of 6 bolts holding it on if I drill the lower triple, which is more than any other piece of plastic on the entire bike.

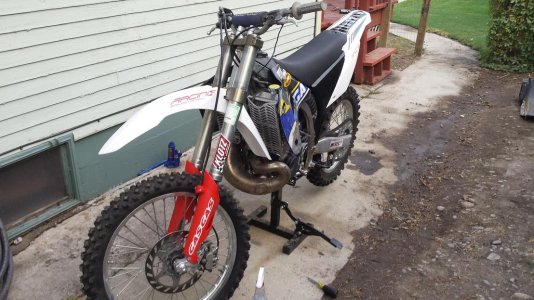
As for the airboot hitting the shock, I'm afraid I'm going to have to unbolt it and rotate it significantly away from the shock. It lines up with the carb very nicely where it's at so I'm considering just melting it.

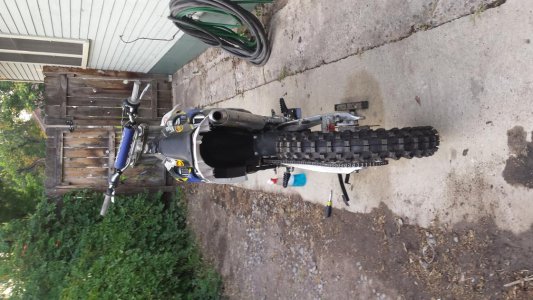
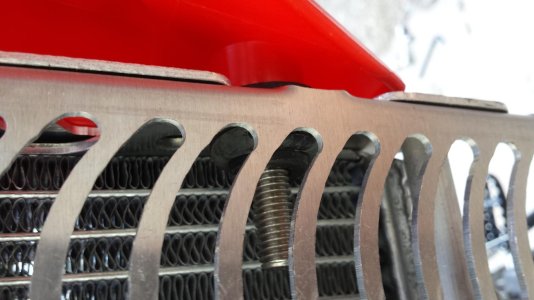
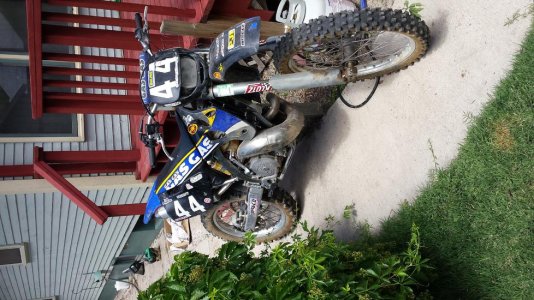
Ok, screw everything I said about that filter retention device. It's really simple. If your plastic wireframe that goes inside the airfilter has prongs sticking out of it, cut them off if they don't have corresponding holes in the airbox. I just reused the one I already had. I don't like the new one that came in the kit. Here's a picture of the device in action. Sorry for the dirt, I do all my work outside :(

The metal piece around the airbox isnt needed on the later models. The prongs on the filter cage are there to fit inside the opening to square up the filter on it. The older bike filters screwed in place, that is why they had the metal rim. They really need to put directions with these kits. I hope you didn't mess the filter boot up by riveting that piece back on?

Don't melt the airbox boot. Don't chance melting a hole in the boot, then you're in for a whole new set of problems. Heat it up with a heat gun or blow dryer.
 
So you're saying I could ditch the metal bits completely? Does the boot itself get held in place against the front/inside of the airbox by the filter device or should I still bolt just the boot to the airbox? The way it is now works pretty good and if I ever lose this spring loaded thing I guess I could always go back to the wingnut. If the spring device holds the boot in place then I'll definitely have to close up some holes that I drilled in the front of the airbox. You do have me wondering if everything will settle just a little nicer without those metal bits in there stiffening things up.

I should edit my other post so no one mistakenly snaps their prongs off. Now that I look at it, it wouldn't work at all with the metal frame even without the prongs.

Just to be clear, the only rivets I used were on the bottom of the airbox where it kind of slides together. I'll definitely take some more pictures of all the hard work I've put into screwing this up.
 
Last edited:
I had a real bastard of a time to be honest. It looks like I've been playing Patty Cake with Edward Scissorhands.

I ended up riveting the front air box plate to the rear, larger portion of the air box before sliding it onto the sub frame. I placed 3/16 inch rivets through the little tabs that overlap the rear section. Then attached the sub frame to the bike as one whole unit, rear fender and all. I had to wrestle every last piece into place every step of the way. I am going to ride this bike until it turns into a pile of dust before I ever strip it down to pieces again.

I did the same with the tabs at the bottom, it just would not stay seated properly if you didn't. I feel for you doing it all yourself, I had my 13 year old Son help me. He likes doing bike projects together.
 
The boot doesn't get bolted to anything, the lip of it pushes thru the hole in the front if the box. Its enough that it will sit in place. They way you have it together now, you could just use the old cage and screw to hold the filter in place.
 
Ok, trial fitting the seat today. Waiting on a part for my carb (stupid pin that the floats pivot on got lost) and I ripped out the metal frame for the air boot. It fits nicely, but MAN do you have to really compress that spring to get it in - which leads me to my one question for the day.

Do the 2012 or newer air boots have the double flange? This style has two flanges on the big end, one goes on the inside the other goes on the outside of the opening in the airbox. If they're significantly different I think I'd be interested in picking up a new style one.

The air boots are the exact same as on your conversion kit.
 
I realize I'm trying to turn a turd into gold here but I don't feel like this is an acceptable level of quality for any aftermarket parts, especially not OEM.

I'm trying to fit the radiator shrouds and I'm finding that if I screw them to the gas tank first, the shrouds aren't long enough to allow the shrouds to attach to the radiators at all. If I attach them to the radiators first, then they don't even mate up with the gas tank correctly where they would fit under the seat.

I've filed away at the nose of the gas tank where it bolts down to the frame right behind the steering stem because it was nudging the stem, blocking progress. It's now pinching the equalizer hose between the radiators. The only way to reroute that is clear round and in front of the steering stem!

I tried installing the seat and find that shoves the gas tank forward considerably. I put a tiny rip in the super thin seat cover in the process of forcing it on there.

Never again.

Crazy how some of them just bolt together and others have fitment problems? Even when I did the conversion on my 97' everything just bolted right together.
 
Did they make a red and white plastic set between 1997 and 2006? I think that would actually look ok. For now I'll be running these old things - they fit fine. Now to devise a method of weaseling a nut behind that unabiker rad guard.
 

Attachments

  • 20150819_192524.jpg
    20150819_192524.jpg
    131.4 KB · Views: 88
  • 20150819_192458.jpg
    20150819_192458.jpg
    131.4 KB · Views: 121
Did they make a red and white plastic set between 1997 and 2006? I think that would actually look ok. For now I'll be running these old things - they fit fine. Now to devise a method of weaseling a nut behind that unabiker rad guard.

I Think my old Rad Guards were tweaked, I bought a new set of Force guards and every thing sits Sweet now.

I have a question though If I get a set of 07 plus radiators and silicon hoses will they just bolt up or was there changes made to the plumbing on the motors as well on the 07 plus bikes?
 
I realize I'm trying to turn a turd into gold here but I don't feel like this is an acceptable level of quality for any aftermarket parts, especially not OEM.

I'm trying to fit the radiator shrouds and I'm finding that if I screw them to the gas tank first, the shrouds aren't long enough to allow the shrouds to attach to the radiators at all. If I attach them to the radiators first, then they don't even mate up with the gas tank correctly where they would fit under the seat.

I've filed away at the nose of the gas tank where it bolts down to the frame right behind the steering stem because it was nudging the stem, blocking progress. It's now pinching the equalizer hose between the radiators. The only way to reroute that is clear round and in front of the steering stem!

I tried installing the seat and find that shoves the gas tank forward considerably. I put a tiny rip in the super thin seat cover in the process of forcing it on there.

Never again.

I spent a lot of time fitting my shrouds to my radiator guards / radiators. My guards held the shrouds out away from the radiators to far and nothing fit right. On the new style shrouds there's a plastic rib that runs vertically. I had to trim lots of that away to get the shrouds to tuck in. If I wouldn't have used the guards I think the shrouds would've fit fine. I also opened up the shroud to tank mounting holes for more screw clearance in the shrouds & sanded the back of the shrouds in the tank area to help fitment. FYI I still have the OE radiators.
 
The unabiker guard adds less than an 1/8 inch on each side. The radiator scoops were about 3/4 of an inch too short. After some more messing around with the gas tank and tweaking the radiators (bending them) I was able to install the shrouds.

One problem with the unabiker rad guard was the mounting hardware was hitting the top motor mount that goes from the frame to the cylinder head. This was preventing me from tweaking them backwards any further until I moved the hexagonal bolt to the outside of the guard and moved the button head bolt to the inside. It gave me just a little more room to bend it backwards.

In the end, my method is to install and secure the shrouds to the radiator, then sit on the bike and pull the radiator and shroud backwards with considerable force and screw them to the gas tank.

The bike is sitting in the sun now, so hopefully the plastic will relax a bit and settle into their new home. The lesson learned from this project has been to walk away and relax a bit before going into a full on rage.
 
Did they make a red and white plastic set between 1997 and 2006? I think that would actually look ok. For now I'll be running these old things - they fit fine. Now to devise a method of weaseling a nut behind that unabiker rad guard.

Have you tried clip nuts for that radiator guard? (j-nuts, sleeve nuts, and other names for the slide on nut/thread)
 
A quick trip to the hardware store and I've got the shrouds secured. I noticed motocrosscenter has headlights included in the kit again, and the price dropped. I shot them an email to get the headlight and have one on the way, at a price of course.

The expansion nuts are listed by the bolt diameter used and not by their actual outer diameter, so that was kind of confusing. The 3/8 socket head bolts work great with an 8mm key.

The Chinese rads are a bit squished in the unabiker guards, but they're holding fluid fine.

I've hijacked this thread enough, so I figure I ought to contribute to the original intention of the thread. I've attached before and after pictures of the bike.
Since I've gotten it, I've replaced the sprockets and chain, front and rear pads and the radiators. I just put an OEM B (S3 marked) piston in. New SX 12 "Competition" tires. The 120 width in Michelin seems to be a lot narrower than the stock tire that was on there, if I go Michelin again I think I could go up to a 140! The airfilter that was in it hadn't been cleaned in 15 years. I attempted to wash it but it disintegrated. I took a propane weed burner to the expansion chamber to burn all the rich carbon build up - at one point it was red hot and burning on its own like a premix powered V1 pulse jet.

I don't mind the 250F written on the side of it, but I do actually think it has nicer lines with the pure black airbox covers.

Hopefully when the float pivot pin I mistakenly threw away shows up in the mail it'll breathe fire.
 

Attachments

  • 20150821_171701.jpg
    20150821_171701.jpg
    104.4 KB · Views: 140
  • 20150821_171709.jpg
    20150821_171709.jpg
    114.1 KB · Views: 130
  • 20150609_135953.jpg
    20150609_135953.jpg
    131.1 KB · Views: 130
  • 20150719_180656.jpg
    20150719_180656.jpg
    131.6 KB · Views: 156
  • 20150821_123241.jpg
    20150821_123241.jpg
    129.1 KB · Views: 207
Last edited:
Hi all, some great mods done here. Does anyone know if a 2010 EC250f subframe, seat and air box will fit a 2005 EC250 2 smoke? I got a chance to buy the kit from some breaking a 2010 250 4 stroke and want to upgrade mine.

Any advice would be great.
 
Hi,

Bought an EC300 -06 today and want to have the same plastics as on my ec250f -10.
Can't find a complete set anywhere, seemes to be out of stock at both greenlandmx and motorcrosscenter (at least the airfilterbox cover).
Anyoe knows where I can get it?
 
Does anyone have pictures of the "2012 Normal" Transformation kit actually installed on an older bike. All I can find are pictures of the kit which are actually on the 2012 frame and it is on a 4 stroke...
 

Attachments

  • 2012 Normal.jpg
    2012 Normal.jpg
    56.7 KB · Views: 57
I am also searching for some other answers:

White hook: be215202511 is a brake hose guide and bolts into the upper triple clamp.

Red Aluminum Washer: Looks like it is used under the bolt that holds the seat down.

I'm guessing the longer bolt is used to go through the seat. But not really sure about the rest. I'll probably post this in the updated plastics thread too.


I was about to say I've never seen those before but mine came in white. I didn't get that red washer and I don't recall that big black plastic one. I don't think I ended up using those expanding push pin things either as I couldn't figure out where they went. I didn't get that ferule looking thing either. My kit was during the batch where headlights and stuff weren't included so I ordered that stuff after the fact.
 
Back
Top