What did you do to your Gas Gas today?

Changed the piston to discover a minor scratch on the inner surface of the cylinder. Seems like next piston change comes with resurfacing of the cylinder.
 
Snapped off both left and right upper footpeg bracket bolts on hard mx landings. Had to drill them out and replace them. Drilled out the threads in the frame and mounted a longer bolt and a nut on the opoosite side.
 
Did round 3 of our Vancouver island series. Tansky grind. Rocks ,roots and mud but great time .
 

Attachments

  • image.jpg
    image.jpg
    129.8 KB · Views: 37
Rejected for the warmer months, lubed and inspected the starter, new grips, and flushed the brakes.

Made the mistake of riding a friends newer bike last weekend and now have the itch bad. Going to try and get out tomorrow weather permitting and see how I feel, but there might be a well loved 2012 in the classifieds soon. Seems like there are plenty of new leftovers out there looking for a home. :eek:
 
went too far reading the service manual :D

11117126_890900847619189_1098636698_n.jpg
 
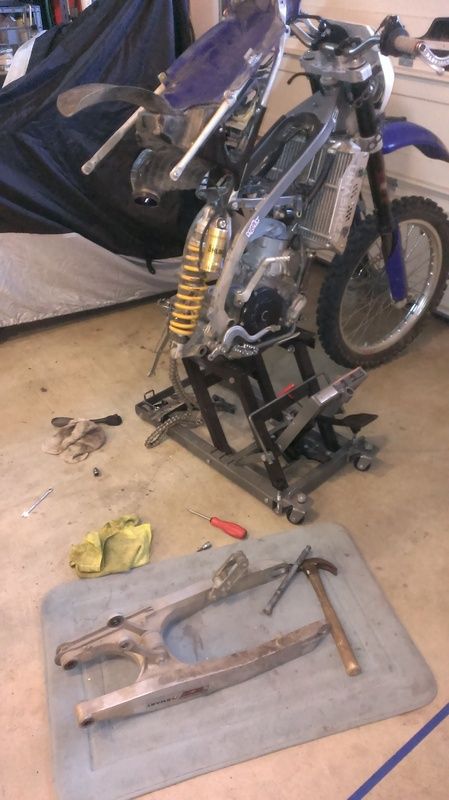
Just beginning my first (and its first) bottom end job. Pulled the swingarm off, discovered that hydraulic clutch slave cylinders just pop right off the motor w 3 bolts, and rebuilding the rear suspension linkage is going to be a tricky job.
IMAG0614_zps8qh2pgmu.jpg


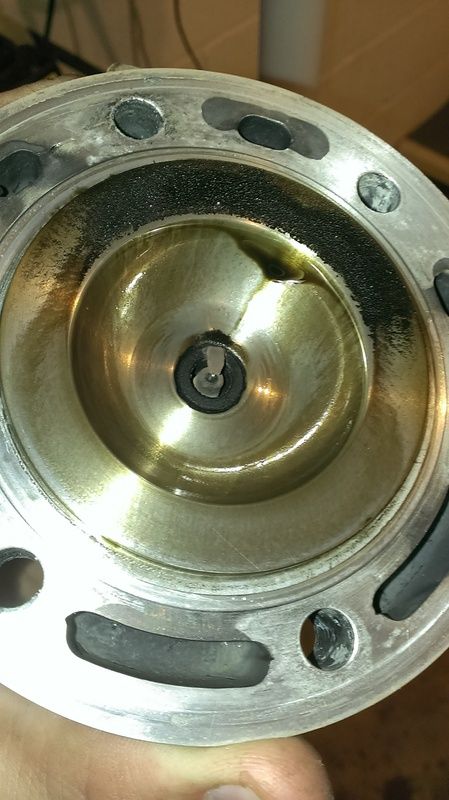
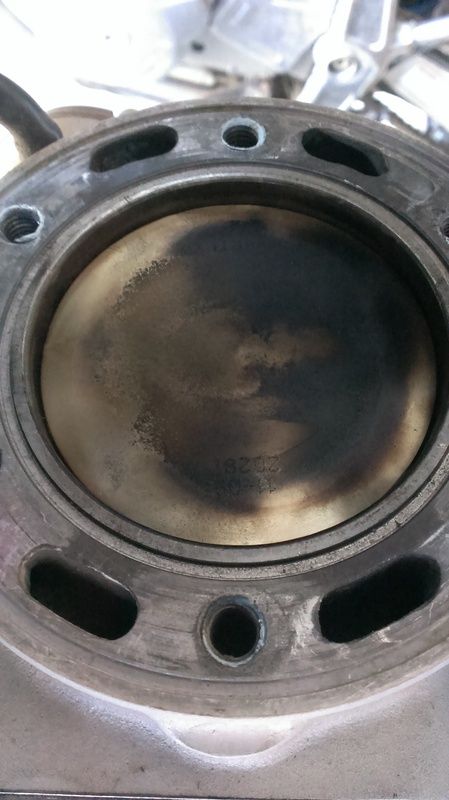
Pulled top end and found a healthy piston, chocolate brown plug, and plenty of residual oil on head
IMAG0441_zpsvugd2vtz.jpg


IMAG0447_zpsir9xcp0s.jpg
 
Just beginning my first (and its first) bottom end job. Pulled the swingarm off, discovered that hydraulic clutch slave cylinders just pop right off the motor w 3 bolts, and rebuilding the rear suspension linkage is going to be a tricky job.

IMAG0614_zps8qh2pgmu.jpg


Pulled top end and found a healthy piston, chocolate brown plug, and plenty of residual oil on head
IMAG0441_zpsvugd2vtz.jpg


IMAG0447_zpsir9xcp0s.jpg

I can't see it in the photos, but it is better on the clutch slave cylinder if it is stored up on the handlebars. Or, if it is all disconnected and off the bike, to keep the slave cylinder somewhat level with the master cylinder. If you leave the slave hanging with no tension against the piston, it may come apart or start leaking fluid past the piston. Short version is "Don't leave it hanging down".
 
I can't see it in the photos, but it is better on the clutch slave cylinder if it is stored up on the handlebars. Or, if it is all disconnected and off the bike, to keep the slave cylinder somewhat level with the master cylinder. If you leave the slave hanging with no tension against the piston, it may come apart or start leaking fluid past the piston. Short version is "Don't leave it hanging down".

Good to know, thanks Jim! I sealed the slave end inside a ziplock bag the best I could, then (just to get it out of the way - before I knew your advice) ziptied the bag below the handlebars, so the two cylinders are approximately level. I bought clutch holder, case splitter, flywheel puller tools from RockyMtnATV, every darn seal/gasket/bearing/bushing one can buy from Bob Piper @ Tahoe Motorsports, I think I see how to pull the motor off the frame and have a couple experienced wrench buddies to help, and Ron @ RB Designs is expecting the crank and new conrod... hope to have her back together by this fall for prime SoCal riding season!
 
Good to know, thanks Jim! I sealed the slave end inside a ziplock bag the best I could, then (just to get it out of the way - before I knew your advice) ziptied the bag below the handlebars, so the two cylinders are approximately level. I bought clutch holder, case splitter, flywheel puller tools from RockyMtnATV, every darn seal/gasket/bearing/bushing one can buy from Bob Piper @ Tahoe Motorsports, I think I see how to pull the motor off the frame and have a couple experienced wrench buddies to help, and Ron @ RB Designs is expecting the crank and new conrod... hope to have her back together by this fall for prime SoCal riding season!

How do you like that trials type chain guide?See post 803 on this thread for my photos regarding the suspension link and swingarm. It takes a little time to do it correctly but it is fairly simple. Note that I only replaced my swingarm bushings, all the bearings were ok after an extensive cleaning and regreasing.Don't lose any of the needle rollers from the suspension link bearings, when you remove the grease they will fall out because they are not caged. If any fall out, just put them back in with a new coating of quality grease.:D
 
Last edited:
How do you like that trials type chain guide?See post 803 on this thread for my photos regarding the suspension link and swingarm. It takes a little time to do it correctly but it is fairly simple. Note that I only replaced my swingarm bushings, all the bearings were ok after an extensive cleaning and regreasing.Don't lose any of the needle rollers from the suspension link bearings, when you remove the grease they will fall out because they are not caged. If any fall out, just put them back in with a new coating of quality grease.:D
this is something i have been mulling over. from my local GG dealer i can get a full linkage kit (bearings, seals and pins) but the lower shock mount is all sold individually so i was thinking that the pin would wear slower than the needle bearings (meanng i would most likely only need to replace the needle bearings and reuse the pin), your post indicates the other way round anyone care to comment on this?
 
How do you like that trials type chain guide?See post 803 on this thread for my photos regarding the suspension link and swingarm. It takes a little time to do it correctly but it is fairly simple. Note that I only replaced my swingarm bushings, all the bearings were ok after an extensive cleaning and regreasing.Don't lose any of the needle rollers from the suspension link bearings, when you remove the grease they will fall out because they are not caged. If any fall out, just put them back in with a new coating of quality grease.:D

Great, you just did the rear end too. Thanks for the heads up and link to the SKF tutorial. I bought a whole rebuild kit from a member here several months ago, so I have the hardware I need (I think), but I'll only replace if wear if evident like you did. We'll see! Re: the chain guide, I'm pretty sure it's the OEM one and, despite reading some grumblings about it, I've been pretty happy with it. I keep an eye on the rollers, bolts, and side sliders and it's been fine - no issues. It is attached with only one bolt to the swingarm (so it can pivot front and back) so it's not as solid as aftermarket ones, but it seems to have survived lots of time in the rocks just fine. The GasGas chain guides are waaaaay more quiet than the hard plastic Beta uses.
 
Nice pic desertgasser, that looks an awful lot like MileMarkers.....I've had boatloads of fun out there for sure...

Not mm, this is 20 minutes from my place in Maricopa. I've been trying like hell to get local riders down here to check it out and no one has taken me up yet. The trail possibilities out here are endless. Just two of us are putting in single track so it's been slow going, so far we have 3 loops with about 30+ miles total. Super slow technical to uber fast twist and go!
 
WAZ yeah they are 120 and 160, plenty of chain clearance on the rear,not used them yet, got the top end off at the min hopefully be back together by the weekend to see what they are like.

Ordered from AAA racing
 
Got up early this morning, changed the front tyre, and bolted the rads back on and fitted the fresco exhaust(excellent fit), also fitted N3EG needle
 

Attachments

  • image.jpg
    image.jpg
    128.1 KB · Views: 53
Back
Top