You are using an out of date browser. It may not display this or other websites correctly.
You should upgrade or use an alternative browser.
You should upgrade or use an alternative browser.
2018 Starter Fix Thread - Continued.
- Thread starter webmaster
- Start date
I'm interested in what the flywheel issue or change is, if anyone knows (or finds out).
And fwiw, a 180cca battery would not work in my bike - but the 240cca Antigravity battery recommended by GG did the trick!
Jeff
Just had mine done today, if I understood correctly, the flywheel change alters the timing from the original 30 degrees to 60 degrees.
Gasser Nate
New member
I still think a lot of the problems guys are having is with leads. I replaced all the leads with much larger cables and added a cable from the battery to the motor and mine spins up from cold on the stock 130cca battery.
The stock leads are dismal in size. I also added an extra earth cable from the battery/sub frame back to the harness earth point to eliminate any losses there too.
But by all means get every update done from the factory now cause it’ll help massively. I’d like to know details on the flywheel changes too, mine was done under warranty but had no starting issues prior to this. The only issue I’d had that wasn’t fixed with updates was a knock under load when hot that was sorted with head machining by TSP in Australia.
Hopefully I get out on the thing this weekend as it has been too long!
Jakobi
Super Moderator
I still think a lot of the problems guys are having is with leads. I replaced all the leads with much larger cables and added a cable from the battery to the motor and mine spins up from cold on the stock 130cca battery.
The stock leads are dismal in size. I also added an extra earth cable from the battery/sub frame back to the harness earth point to eliminate any losses there too.
But by all means get every update done from the factory now cause it?ll help massively. I?d like to know details on the flywheel changes too, mine was done under warranty but had no starting issues prior to this. The only issue I?d had that wasn?t fixed with updates was a knock under load when hot that was sorted with head machining by TSP in Australia.
Hopefully I get out on the thing this weekend as it has been too long!
I don't think anything has been done to mine.. out of the crate onto the floor and into my hands.
Head cut, bike a solid going over.. earths rubbed back and that's it. No starting issues on or off the button.. Haven't put many hours on her though.
Even had people comment how well she cranked over when I had the spark plug out pumping the water out of the crankcase after a creek was a bit deeper than expected.
fred99999au
Member
I'd be interested in the amount of effort needed to move the helical gear of the whole mechanism if the starter motor was removed. Should be minimal as mine is now is my guess.
I can stick my finger and pretend I am starter motor and turn the gear with minimal resistance. Bendix wont engage as my digit is too slow, but it moves freely.
Spins like a top with the stock battery.
Based on what I have seen on my GP300, the axle shaft tolerance is too tight and binds it, requiring a swag of extra torque, also meaning extra load on the starter motor. YMMV.
farmerj
Platinum Level Site Supporter
Just wanted to update that I fixed my starter problem. The issue was the bendix cover. It is very easy fix, the only thing you will need to buy is the bendix cover gasket and flywheel cover gasket. When you remove the covers the gaskets are going to fall apart.
- pull your bendix and bendix cover off and remove the bendix assembly. With the bendix out, stick the bendix onto the cover and you can see that it is a very tight fit. It should not be this tight. It is so tight that it is not allowing the bendix shaft to rotate. It needs to be able to rotate freely. I used toothpaste and a Dremel with a polishing wheel on it and polished the inside of the bendix cover where the bendix shaft sits. Toothpaste works great because of the abrasives inside it, but it will not take away too much of the material from the metal. If you don?t have a dremel you could use your finger and a rag and run around inside the hole in the bendix cover, it will just take a little longer. After I finished polishing the cover I went to fit the bendix back in the cover and it slides in effortlessly and spins freely. I put a tiny bit of grease in there and around the gears and put everything back together. The bike now starts instantly first stab of the button, even in gear.
- pull your bendix and bendix cover off and remove the bendix assembly. With the bendix out, stick the bendix onto the cover and you can see that it is a very tight fit. It should not be this tight. It is so tight that it is not allowing the bendix shaft to rotate. It needs to be able to rotate freely. I used toothpaste and a Dremel with a polishing wheel on it and polished the inside of the bendix cover where the bendix shaft sits. Toothpaste works great because of the abrasives inside it, but it will not take away too much of the material from the metal. If you don?t have a dremel you could use your finger and a rag and run around inside the hole in the bendix cover, it will just take a little longer. After I finished polishing the cover I went to fit the bendix back in the cover and it slides in effortlessly and spins freely. I put a tiny bit of grease in there and around the gears and put everything back together. The bike now starts instantly first stab of the button, even in gear.
Just wanted to update that I fixed my starter problem. The issue was the bendix cover. It is very easy fix, the only thing you will need to buy is the bendix cover gasket and flywheel cover gasket. When you remove the covers the gaskets are going to fall apart.
- pull your bendix and bendix cover off and remove the bendix assembly. With the bendix out, stick the bendix onto the cover and you can see that it is a very tight fit. It should not be this tight. It is so tight that it is not allowing the bendix shaft to rotate. It needs to be able to rotate freely. I used toothpaste and a Dremel with a polishing wheel on it and polished the inside of the bendix cover where the bendix shaft sits. Toothpaste works great because of the abrasives inside it, but it will not take away too much of the material from the metal. If you don?t have a dremel you could use your finger and a rag and run around inside the hole in the bendix cover, it will just take a little longer. After I finished polishing the cover I went to fit the bendix back in the cover and it slides in effortlessly and spins freely. I put a tiny bit of grease in there and around the gears and put everything back together. The bike now starts instantly first stab of the button, even in gear.
Do you have any photo's of the process?
Well done on figuring it out!
I don't have any pictures but its a pretty easy process once you know what to do and look for
-disconnect battery and disconnect power supply to starter, pull starter
-Remove stator cover
- look in through the back of the stator cover, there is a bigger fine tooth gear and a smaller gear with not as fine teeth. you can only see about half of that fine tooth gear. you should be able to turn the fine tooth gear easily with your finger. If it does turn effortlessly, the problem is not your bendix. It might be the starter or some other issue. If it is hard to turn the fine tooth gear...
-flip the cover back over and remove the small bendix cover
- from here you can pull the bendix assembly straight out. pull it out.
- with the bendix pulled out fit the bendix cover onto it, there is an indent in the cover where the bendix shaft sits.
- You will probably find that it is a very tight fit for the shaft to go into its place in the cover, it should not be like this, you need to make the hole a little bigger
- don't use sandpaper or anyting like that, you don't want to take too much material off. I used toothpaste and a dremel with a polishing wheel.
-When I was able to fit the bendix cover to the shaft with no resistance I cleaned out all of the old grease and a tiny bit of new grease in there, put the bendix back in and put the cover on.
-with the bendix back in place and the cover on, put the starter back in the assembly but leave everything off of the bike. Hook the starter leads back up and connect the battery. give it a few starts to get everything moving smoothly.
-put the stator cover back on and hook everything back up to normal and try it out.
when I removed the covers both of the gaskets fell apart so you will need to have new gaskets. you could use some high temp silicone if you really wanted to but a gasket will be much cleaner. I got them for 5$ from gasgaspartshouse.com
Gasser Nate
New member
This is why I think the wet mod is such a good idea. The case actually gets some lubricant other than tacky thick grease that just gets flung to the case and not on the gears and bearings that need it. Mine is so much quicker and quieter than the others I ride with and all with the stock 130cca battery.
distortion10
New member
Hello all.
I’m new to gasgas and glad to have 7 hours on my new 18’ ec250. It’s light years ahead of my CRF....accept for the estart. Starts cold with the kickstart first kick every time but never with the estart. Maybe 50/50 when using the estart on the trail.
Last week I added a ground wire from the battery to the starter bracket. This made trail starting better but not perfect and still no cold estart.
Today I replaced all of the positive and negative wires in the battery/starting circuit. All connectors were crimped then soldered before being shrink wrapped. The estart system works perfectly now.....like it was made for the job.
Also swapped to a 125cca battery but it’s barely larger than the oem so I doubt that did it. Cheers.
Sent from my iPhone using Tapatalk
ssaulnier
Silver Level Site Supporter
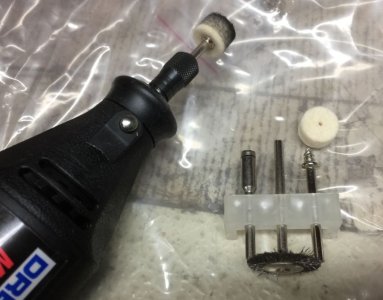
Friday I discussed this with Jim Haugen the Gasgas Technical advisor. He suggested that I check the electric start bendix for binding in the end cap on the left side engine case. I removed the starter and the left side cover. I did not feel what I thought was excess binding when I rotated the bendix gear, but I polished the hole inside that outer bendix cover anyway and now my starter works from cold. At least it did last night. I used a dremel tool with a felt polishing pad that was a snug fit in the bore of the case hole. Polished it up dry for about a minute, until I could feel the aluminum getting warm and then I stopped. Looks nice and shiny in that hole now. Took off very little material, but seems to have made a difference in starting.
Apparently even a little binding of the bendix will cause very high current to flow to the starter which drags down the battery voltage so the CDI can't fire the coil. I could see that was my problem before because I monitored the spark while cranking and only saw a fraction of a second sparking for several seconds of cranking.
Larger diameter cables help because not as much voltage gets dropped on a thicker cable with less resistance so more voltage is available for the CDI and coil. But in my case the #8 AWG cables were not enough.
I am still using the 150 CCA battery that the dealer put on the bike to replace the dead stock battery when i picked up the bike.
My bike still will not start in gear. Too much clutch drag I think.
ssaulnier
Silver Level Site Supporter
Dremel model 414 1/2" diameter felt polishing wheel
I used a Dremel model 414 1/2 inch diameter (12.7mm) felt polishing wheel dry with no polishing compound. It uses the #401 mandrel with the corkscrew looking tip.
https://www.dremel.com/en_US/products/-/show-product/tools/414-felt-polishing-1-2-wheels
I tried the electric starter again last night and worked fine.
I believe that polishing the bendix end cap bore on the side cover did the trick for my bike, in addition to the larger battery cables and grounds. I am still using a relatively small capacity 150 CCA battery, but I am sure that a larger capacity battery like the 240 CCA Antigravity AG-YTZ7-8 would work better and might even start my bike in gear.
Wishing all happy starting and happy trails...... Cheers, Steve
ssaulnier
Silver Level Site Supporter
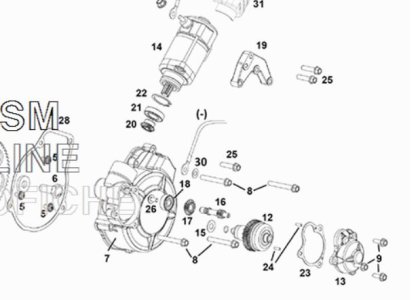
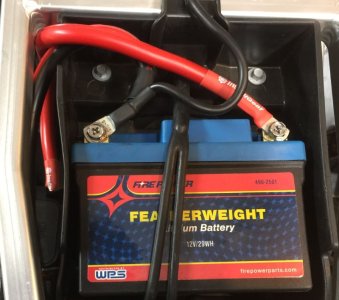
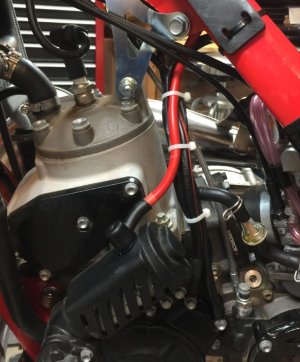
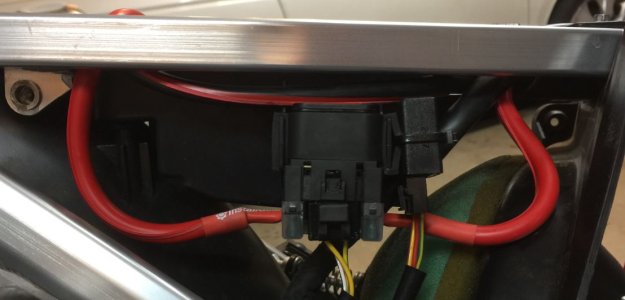
Images of the #8 AWG cables I installed, the Dremel tools and the ignition side cover components involved.
Process I followed:
1. Run #8 AWG cable from +BAT to solenoid.
2. Run #8 AWG cable from solenoid to +Starter.
3. Run #8 AWG cable from battery GND to starter bolt (as shown on parts diagram).
4. Repurpose old starter supply cable. Connect between side case bolt and coil mounting bracket bolt.
5. Polish #13 Bendix Cover bore to reduce Bendix drag.
Remove 2 screws #25 from Electric Starter Cover, Remove Cover.
Remove nut #29 from starter cable.
Wiggle/twist #14 Starter out of Ignition case.
Remove bolts #8 and #25 from #7 Ignition Cover.
With finger rotate Bendix and estimate drag/tightness.
Remove #9 bolts from Bendix Cover #13 on parts diagram. Remove Cover.
Clean grease from Bendix Cover bore and lightly polish bendix bore with clean dry 1/2" felt pad and Dremel tool. Don't polish too much maybe 1 minute max.
Remove and replace thin paper gaskets #28 and #23 since they generally tear upon cover removal.
Apply grease to Bendix Cover bore, Reinstall Bendix Cover to Ignition Cover and reinstall Bendix into Ignition case. Reinstall Ignition case, starter, bolts and cables.
Attachments
I forgot that I took this video.
This is what it should feel like after the hole in the bendix cover is polished. The bigger fine tooth gear should turn effortlessly with your finger. Before polishing mine I could not turn that gear.
https://m.youtube.com/watch?v=a1y8bnrAWME
This is what it should feel like after the hole in the bendix cover is polished. The bigger fine tooth gear should turn effortlessly with your finger. Before polishing mine I could not turn that gear.
https://m.youtube.com/watch?v=a1y8bnrAWME
ssaulnier
Silver Level Site Supporter
Nice Video, thanks for adding to this thread!
When I performed that finger spinning test of the Bendix gear I did not notice any significant drag. But apparently my fingers are not calibrated very well, because after polishing the Bendix bore in the Bendix cover and freshening up the grease my starter now functions properly.
When I performed that finger spinning test of the Bendix gear I did not notice any significant drag. But apparently my fingers are not calibrated very well, because after polishing the Bendix bore in the Bendix cover and freshening up the grease my starter now functions properly.
distortion10
New member
I forgot that I took this video.
This is what it should feel like after the hole in the bendix cover is polished. The bigger fine tooth gear should turn effortlessly with your finger. Before polishing mine I could not turn that gear.
https://m.youtube.com/watch?v=a1y8bnrAWME
Thanks for the vid. What’s the benefit of removing the ignition cover besides the finger test? Now that it’s a known issue does it make sense to forgo removing the ignition cover and go straight to the bendix cover? Polish it, reinstall and ride?
It’d save me the cost of a new ignition cover gasket.....course I’d just by 6 pack of beer with that money. lol. But still.
Sent from my iPhone using Tapatalk
Similar threads
- Replies
- 7
- Views
- 892
- Replies
- 5
- Views
- 2K

